GENERAL PROJECTS AND OTHER CRAP
We have many projects that we've worked on that don't really fit in any classification or are really big enough to warrant creating a whole page of documentation for them, so we decided to create a page specifically for general crap that we do that is essential to the efficient workings of the homestead, so just scroll down to take you to the general crap and enjoy some more reading!
While you internet viewers have probably seen all of the pages presenting the exclusive projects that we've been working on, there are also those little things that we do around the homestead that deserve at least some honorable mention, since even the little projects play a pivotal role in the success of the homestead. Since most of these projects are so small that we may only have one or two pictures of any given thing we finish, they will be documented on here based on their completion, with the topmost ones being the first to be completed, then working our way down. So enjoy!
WOODEN WALKWAY
This simple little setup came about after getting tired of plodding through the endless mud puddles that seem to remain during the rainy season (winter). Since this whole area is all dirt and small patches of grass, the area is pretty messy all the way up to the house. I personally get tired of always having to walk in with my boots covered in mud, transferring it to the house or truck, or wherever else I walk, so my solution - build a walkway from the "driveway" to the stairway of the porch for walking on, so at least when I'm walking from the house to the truck and back, I don't make a big mess. As far as when we're working on crap outside, thats a different story for a different day.
The walkway is pretty simple, just two 2x4 boards laying side by side about 2 feet apart, with some boards that are about an inch thick x 6 " wide (Lowe's didn't classify them as 1x6's they had some other oddball size on them) laid across the 2x4s and spaced about 2" apart. The walkway stretches for a good 26' from the porch to the driveway where it ends on solid ground right at the edge of the gravel.
This walkway works very good in that there are no more muddy boots whenever I come home from the job. Even in the worst rain when the rest of the yard has turned in to a swamp, the walkway serves its purpose as a bridge to the house. One may wonder why not just dump gravel down over all of this, well first of all, gravel only comes by a dump truck load, which would be reserved for driveways or the like. Secondly, the ground has some trenches that we dug a year ago to divert rainwater around the house's foundation. and putting gravel all over that area would allow for rainwater to more easily run under the house, washing away the dirt under the pilings. This was cheaper then trying to do any kind of setup with gravel or bricks or any other rock based material. Even with gravel down, rain would've still washed over it causing the gravel to sink in the mud and creating a mess all over again. This way, our feet stay clean, but again, when we work in the "driveway area" where all the cars and their associated crap lay, we're on our own. Now if only we can get some gravel.....
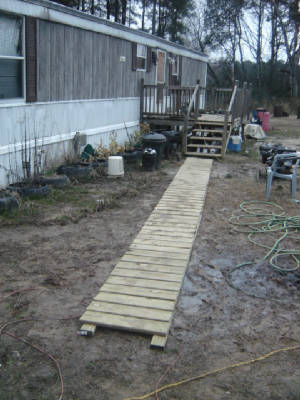
Wooden walkway leading from driveway to house deck.
GO KARTS
We recently acquired three go karts that were in various states of disrepair for a cheap trade, along with several dead engines, with the intent of restoring operation to all of the vehicles, keeping one of them and selling the other two. The intent of keeping one of the go karts was to use the vehicle for our pending hydrogen generator experiments, before creating full size apparatus for the regular cars.
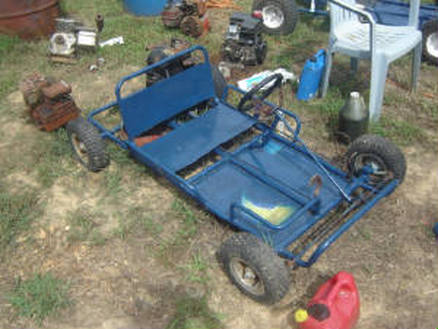
The first kart we got back up and running is a two seater for smaller kids, a one seater for any average adult. It has a 5 hp Briggs engine and a roll bar behind the driver's seat. After cleaning the carb and changing the oil we were able to get the vehicle back up and running. Once the engine was running we took the kart for some test drives. When the engine stays running, that fucker really moved! With a good tire on the drive side, that kart would've really ran like a bat out of hell! The only flaw the engine has is that it doesn't idle at a reasonable rpm at times and will sometimes stall out then be a bitch to start back up. The kart also received a complete spray painting to make it look a lot better as well.
We recently acquired three go karts that were in various states of disrepair for a cheap trade, along with several dead engines, with the intent of restoring operation to all of the vehicles, keeping one of them and selling the other two. The intent of keeping one of the go karts was to use the vehicle for our pending hydrogen generator experiments, before creating full size apparatus for the regular cars.
The first kart we got back up and running is a two seater for smaller kids, a one seater for any average adult. It has a 5 hp Briggs engine and a roll bar behind the driver's seat. After cleaning the carb and changing the oil we were able to get the vehicle back up and running. Once the engine was running we took the kart for some test drives. When the engine stays running, that fucker really moved! With a good tire on the drive side, that kart would've really ran like a bat out of hell! The only flaw the engine has is that it doesn't idle at a reasonable rpm at times and will sometimes stall out then be a bitch to start back up. The kart also received a complete spray painting to make it look a lot better as well.
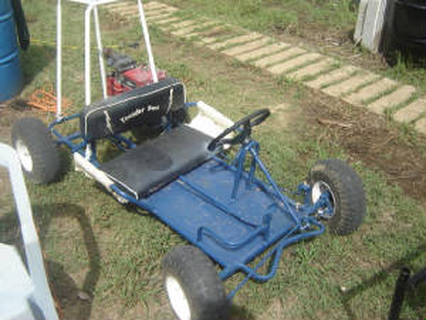
The first go kart completed.
The second kart is a larger black kart with two seats that look like they will accomodate two adults snugly. This one had a 5 hp Tecumseh available but the engine is missing the carb, exhaust and air filter housing, as well as the seat panels. The first thing that was done was the acquisition of a 6.5 hp engine from Harbor Freight after finding a coupon to get the engine for $100. The seats are temporarily replaced with plywood panels for the time being until we can acquire some real go kart seats. This kart also received a good spray of black paint. Despite the throttle cable being a little stiff, this kart is able to get up to speed pretty good too, not like the other one, yet. A new throttle cable is on order along with a new drive tire since the current one is bald as hell. This kart also had a roll cage but it's been removed. We will probably get some conduit to fabricate a better one, just for decoration if anything. Another plan that I suddenly came up with was to fabricate a gas fuel mixer to bolt to the Tecumseh in place of the carb, along with a homemade exhaust pipe if I don't decide to just buy a cheap muffler. That engine will serve as the experimental gaseous fuel test engine, for propane and hydrogen, among other gaseous fuels.
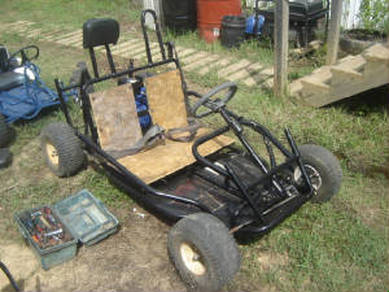
The second go kart all fixed up.
|
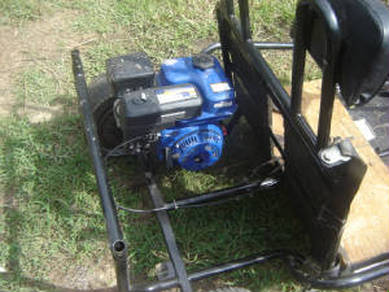
Go kart's new engine.
|
The last go kart is a small kiddie two seater (one seater adult) that's pretty much the smallest one of the group. This one would've had a 5 hp engine, but the engine that was chosen was unable to be resurrected, even with the aid of parts from the spare engines, it was a lost cause. We ended up getting a cheap 3.5 hp Briggs engine from a guy off of Craigslist, and having to use the carb and fuel tank from one of the dead engines to resurrect this little engine. I figured the 3.5 hp engine would be more than sufficient for this small kart due to the fact that a go kart for little kids shouldn't be able to run past the speed of light. This kart will be getting a fresh chain to get things off and running. A paint job and switching of the drive tires for one of the good tires on the kart will further complete this kart.
Last but not least, the baby.
With that, the three karts are complete with ours soon to be ready and the other two ready for sale after the couple of little things get done. The money will help us further pursue our other endeavors.
OIL DRUM DOG HOUSE
Here's another simple little build that killed two birds with one stone, a simple dog house built using materials that are considered scrap or trash in most circles. In this case, an old oil drum and a pallet are the main components of this setup, along with a couple of short cuts of 2x4's.
This simple setup came to be out of need for a shelter for a stray dog that came to our property and just didn't really want to leave. Nevermind the idea that the dog was nice as he wants to be and you almost couldn't help but be friends with him, which just solidified his desire to stay. Also no one was interested in taking him off our hands so we just said screw it and kept him here, he does make a good early warning system so he's at least earning his keep. But he needed a more permanent house.
We used an old oil drum that was part of an old chicken tractor project that fell apart after a while, and since we planned on using the same drum for our new chicken tractor (posted on another page on this site), we needed to set something up for ole Dickhead (yeah I named the dog Dickhead).
The oil drum doghouse is simple, I drilled four holes in what is to be the bottom of the house, then drove four screws through the holes into the pallet boards to anchor the drum down. Next I took two short 2x4's (approx. 1.5 ft long) and drilled a couple more pilot holes on the sides of the drum with which to drive wood screws through to hold the boards on at an angle. Some more long wood screws drilled in at an angle at the bottom of the 2x4's into the pallet boards further secured the boards together, making for a solid bracing that holds the oil drum nice and tight.
A doorway was cut into the "top" of the oil drum long before this was started and all oil residue was removed. A wood fire was started in the drum to burn off any remaining residue then everything was rinsed out prior, so no worry folks about the doggie getting sticky or sick from old oil. What I did do though to protect the dog from getting cut on the edges of the "doorway" was to take some fuel hoses, cut them lengthwise and slide the pieces over the edges to serve as cushions to keep the dog from scraping against the sharp metal.
Overall this simple setup works out, DIckhead took to his new house pretty quickly. It was a lot cheaper than spending $60+ for one of those igloo dog houses or any other large plastic doghouse.

The completed oil drum dog house.
|
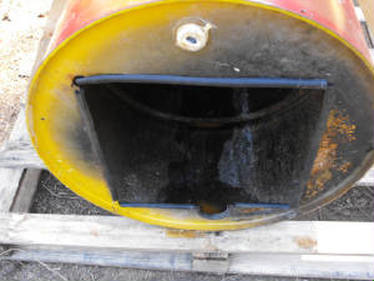
Closeup of fuel hose bumpers around edges of doorway.
|
THE JUNKER AIR COMPRESSOR
This was a little pet project that I worked on as a means to take care of some extra junk we had lying around the 'stead. We had two air compressors, one small one, like one of those little ones you use for nailguns, has a tank on it of maybe a gallon or two in capacity, and a larger compressor with probably an 8 gallon tank on it. The small unit ran, but the pressure switch was non functional and the thing never really pumped up to full pressure before shutting off. The bigger unit had a seized up compressor pump. My plan, blend the two units together to make one working unit.
This was done by taking the motor/compressor unit off of the small compressor and attaching it to the large compressor's tank, then using one of the extra pressure switches we had laying around, along with some miscellaneous plumbing and hardware to complete the package.
The first thing I did was spray paint the tank, just for asthetics, if I'm going to build a new compressor, might as well make it look good to some degree right? The tank got a good coating of blue paint, all around.
The next thing was welding a plate to one end of the deck and drilling holes to accomodate the retaining screws for the motor/compressor unit. After bolting that down to the plate I then did a combination of plumbing fittings that allowed me to get the pressure switch, pressure gauge, the relief valve, and the bleed line that feeds to the pressure switch to pop the contacts when a certain pressure is reached. After a little playing around, I managed to get the whole unit put together rather neatly, if I do say so myself. I had to rewire the pressure switch with the motor and a power cord we had laying around as well. With the package completed, I fired the unit up. Due to the small size of the compressor pump this thing did indeed take a good while to pump up to around 90 psi, but really for all intents, this air compressor is going to mainly be used for light duty stuff like filling tires and what not, no heavy duty stuff.
All in all I would say this project was a success and it provided us with another useful item that would've otherwise continued to lay around in the form of extra junk. The only things really saved from the parting out of the two old units was the motor from the big compressor and the small tank from the other unit, things that can be put to use in some future projects.
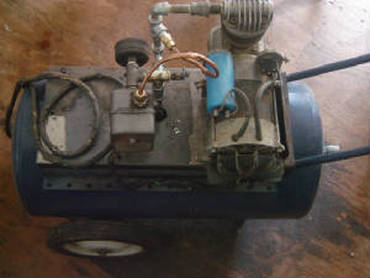
The junker air compressor.
|
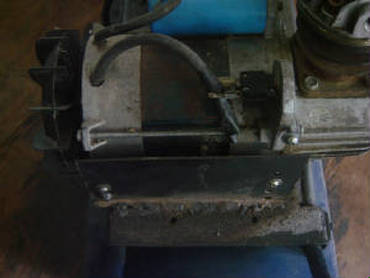
Closeup of welded plate holding motor/compressor.
|

Closeup of hardware on top of compressor tank.
HOMEMADE BOOKSHELF
This little project spawned from a larger project to revamp the layout and utility of the house. After having the same furniture and same layout with everything from furniture to the storage of miscellaneous items through the house, we started a redecorating program so to speak. We got rid of many older pieces of furniture, replacing them with newer pieces that we desired based on our new requirements for the house. Part of this is extending to the extra bedroom, which is in the process of being cleaned out and reorganized as of this writing. One of the bigger things for this room is a bookshelf to hold the miscellaneous books and binders of information we have stored in there. Currently this media is just laying around in random piles through the room with other crap stored on top. With the bookshelf in place this would clear a lot of stuff from the floor, gaining more organization and allowing us to further set the room up as we desire.
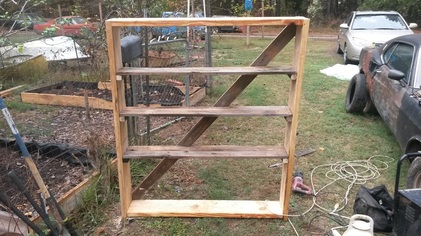
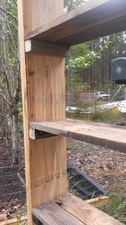
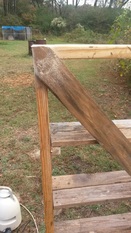
Of course just like with the other furniture that we acquired, we went to craigslist to find good pieces of used furniture. Unfortunately we were unable to find any bookshelves for a low price, seems that every one we found someone put their hands on it well before we could get a chance. At this rate I got tired of hunting and just figured I could throw one together with a few 2x8 boards and a bunch of salvaged long pallet boards I have laying around in a stack. This ended up consisting of one 2x8x10 and a 2x8x8 board. Both of these boards were to be cut in half with the two 5ft sections being the sides and the two 4ft sections being the top and bottom. Some 1x1 boards from my salvage pile were cut to 7" lengths to make the ends to hold the shelf boards. These were attached using deck screws that we have in bulk. The pallet boards were 3.5" wide, requiring 2 boards for each shelf. After these requirements were met, the boards were attached using drywall screws at an angle to the 1x1 boards, securing the shelves. Another longer 1x3 pallet board was attached to what would be the rear of the shelf at an angle to help maintain rigidity of the shelf. With the completion of the shelf, we carted the thing into the house and set it up and immediately began filling it with books and stuff. We will be able to accomodate all media and still have room to spare.
Of course just like with the other furniture that we acquired, we went to craigslist to find good pieces of used furniture. Unfortunately we were unable to find any bookshelves for a low price, seems that every one we found someone put their hands on it well before we could get a chance. At this rate I got tired of hunting and just figured I could throw one together with a few 2x8 boards and a bunch of salvaged long pallet boards I have laying around in a stack. This ended up consisting of one 2x8x10 and a 2x8x8 board. Both of these boards were to be cut in half with the two 5ft sections being the sides and the two 4ft sections being the top and bottom. Some 1x1 boards from my salvage pile were cut to 7" lengths to make the ends to hold the shelf boards. These were attached using deck screws that we have in bulk. The pallet boards were 3.5" wide, requiring 2 boards for each shelf. After these requirements were met, the boards were attached using drywall screws at an angle to the 1x1 boards, securing the shelves. Another longer 1x3 pallet board was attached to what would be the rear of the shelf at an angle to help maintain rigidity of the shelf. With the completion of the shelf, we carted the thing into the house and set it up and immediately began filling it with books and stuff. We will be able to accomodate all media and still have room to spare.
|
|
Pics of shelf right after construction, note the 1x1 boards under the shelves, the two board shelves themselves and the diagonal brace board.
