THE NEW FUEL SHED
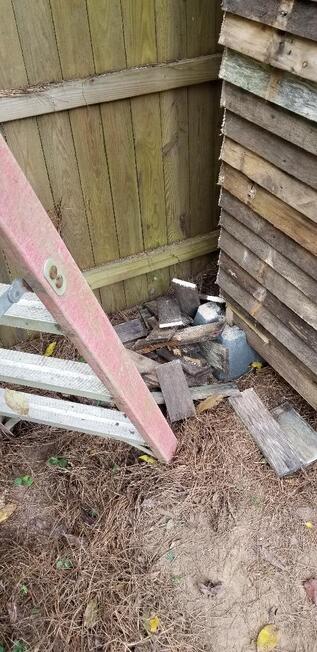
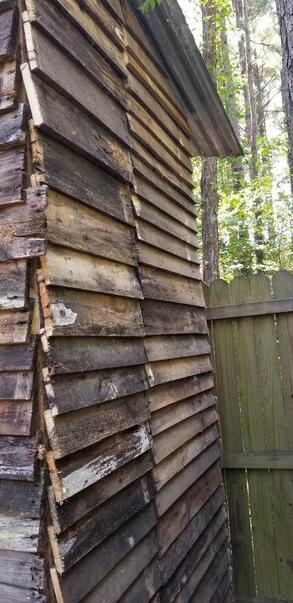
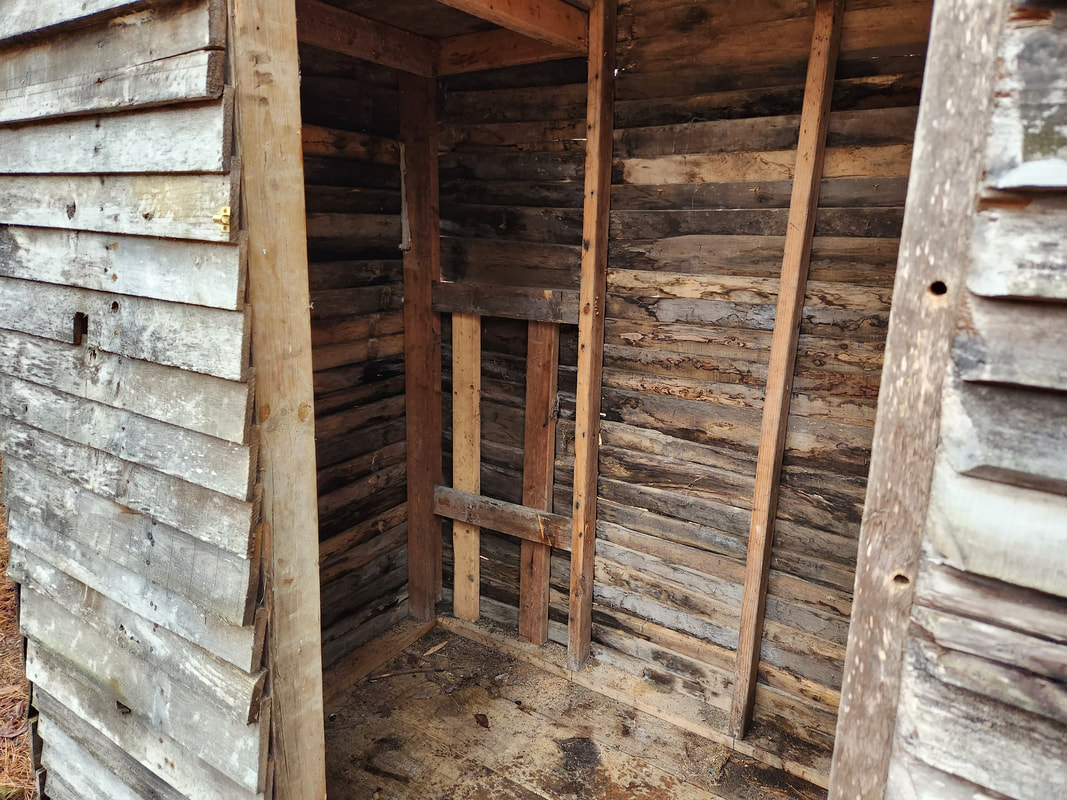
We've already had a fuel shed for a few years now, one that was made from pallets, plywood and some roofing metal. This thing was really not the best setup to begin with but was made due to the fact we had a bunch of disposable pallets at our disposal. Fast forward to now and the fuel shed is rickety as hell and overall is falling apart. The weight of the drums is making the pallet/plywood floor cave in and just the idea that the whole structure is a three walled shed allows rain and shit to get in all around the drums. Since the old storage shed was dismantled and a lot of wood was salvaged, my new plan is to build a new fuel shed using the materials, in a new location that'll allow for the condensation of the overall footprint of the homestead. The plan is to make the shed more compact as well. The current shed is much larger than really need be as we don't even store the kind of volume that the structure would've been capable of. Hell, the floor couldn't support the weight of the number of drums that would fit in the shed.
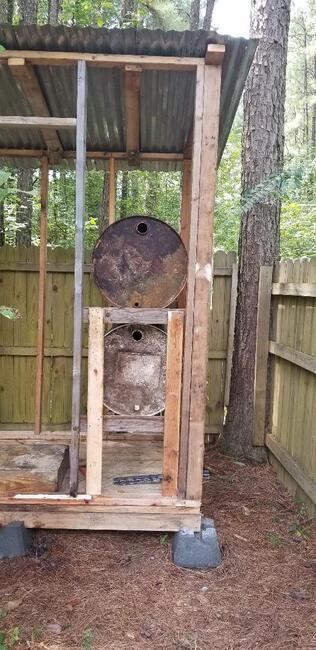
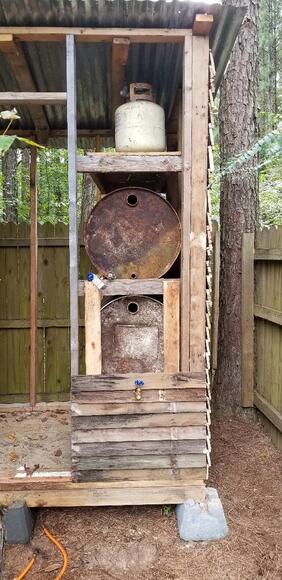
The new shed is gonna have three drums inside. Two will be stacked sideways on one side of the shed, on top of one another. I'll add some extra wood support between the studs and walls to make a cradle of sorts that will hold the drums one over the other neatly. The third drum will be supported the same way on the opposite side of the shed but instead of another drum I will add a couple of shelves over the drum. These shelves will hold a couple of 25lb propane bottles and some 5 gallon buckets of oil wood. The oil wood will basically be small cuts of scrap wood stacked neatly in the buckets and old motor oil poured into the bucket to soak into the wood over time. These oily pieces of wood will be used to accelerate the starting of fires inside my fire pit drum while working outside in the winter. They'll help get wet pieces of wood started faster as well.
The next plan with the drums will be to use pipe fittings to be able to link the two drums. The drums will be oriented where the ports will be one over the other. The top port on the top drum will have a pipe nipple placed into the port with an elbow going up, then another pipe nipple installed with a cap. This will be the filler tube. The cap is removed, a funnel inserted and gas is poured in via a gas can or other means of administering fuel into the drum. As the top drum fills up, fuel will flow into the bottom port which will have a nipple, elbow angling down with another nipple, a union, another nipple, an elbow angling into the top port of the bottom drum and a final nipple going into the port. Fuel will flow into the bottom drum, fill it up then continue to fill up the top drum. Lastly the bottom port of the bottom drum will have a length of pipe extending out from the drum, through the wall to the outside, where a valve will be attached with an elbow and nipple angling down to allow for filling gas cans. This simple gravity feed system will allow us to fill fuel cans without using any kind of pump. The other solitary drum on the other side of the shed will contain kerosene and the top port will be set up for filling the drum and the bottom port set up with a pipe going out to fill fuel cans too.
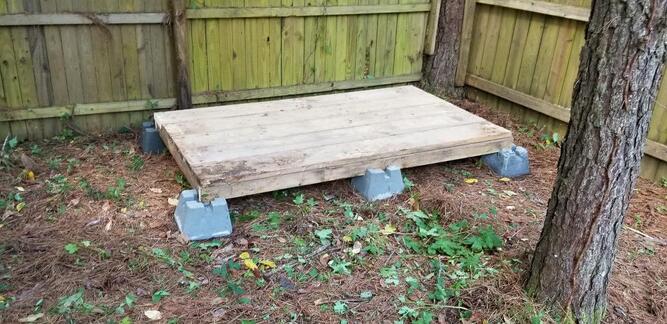
This setup will allow for us to fill cans without even having to go into the shed, let alone install pumps temporarily just to fill fuel cans. Now, to build this shed I plan on building a foundation base on the footprint of a 4x8 piece of plywood. As stated, the structure does not have to be big. I'll use 2x4s and our air stud nailer to make a frame with 24" spacing. Next I took the 2x8 boards that were used for the floor support in the old shed and nailed those to the foundation frame. I cut the excess from the boards with our reciprocating saw.
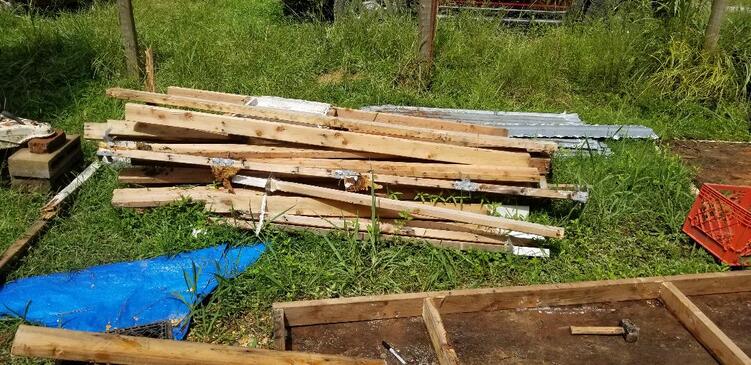
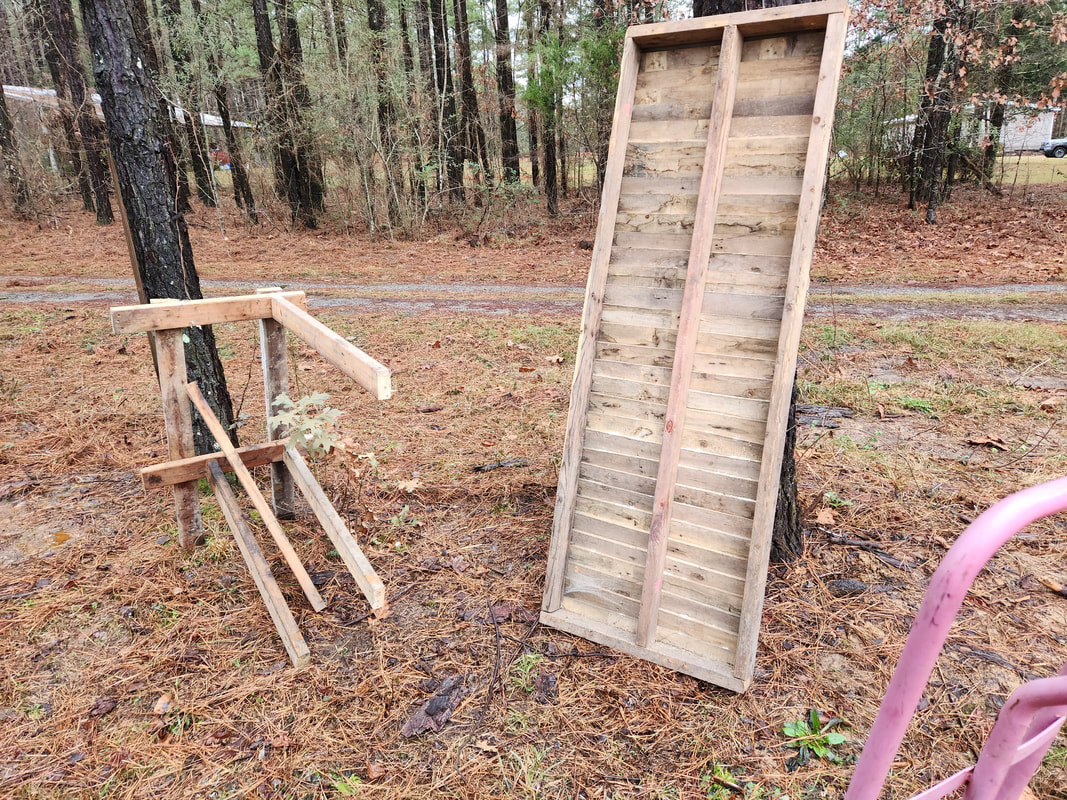
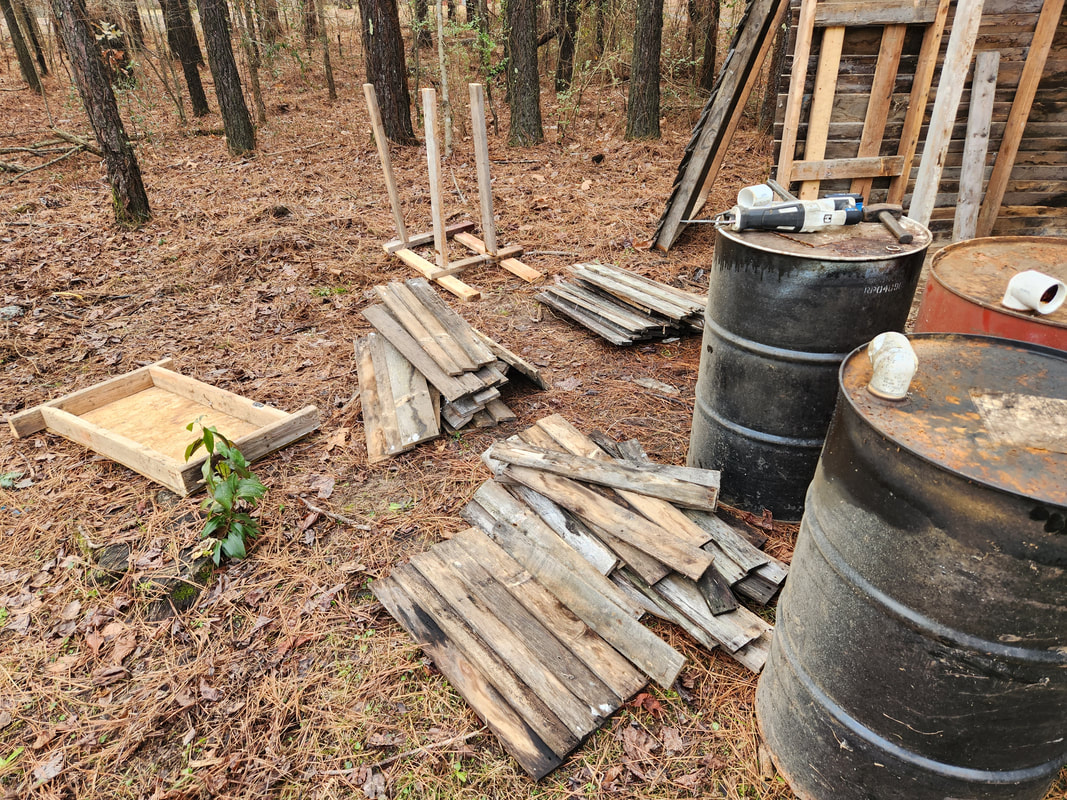
Salvaged wood piled up awaiting use in our new project.
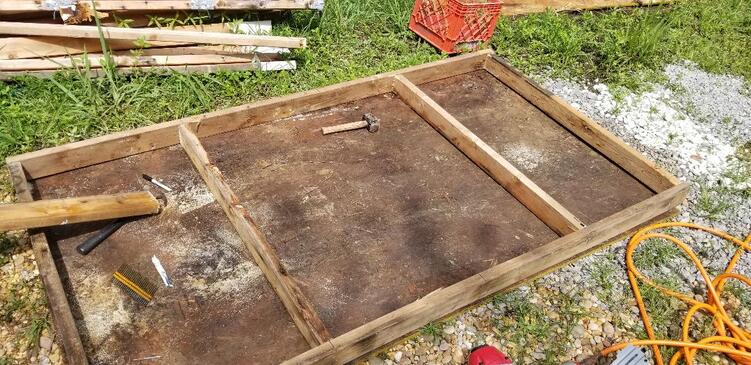
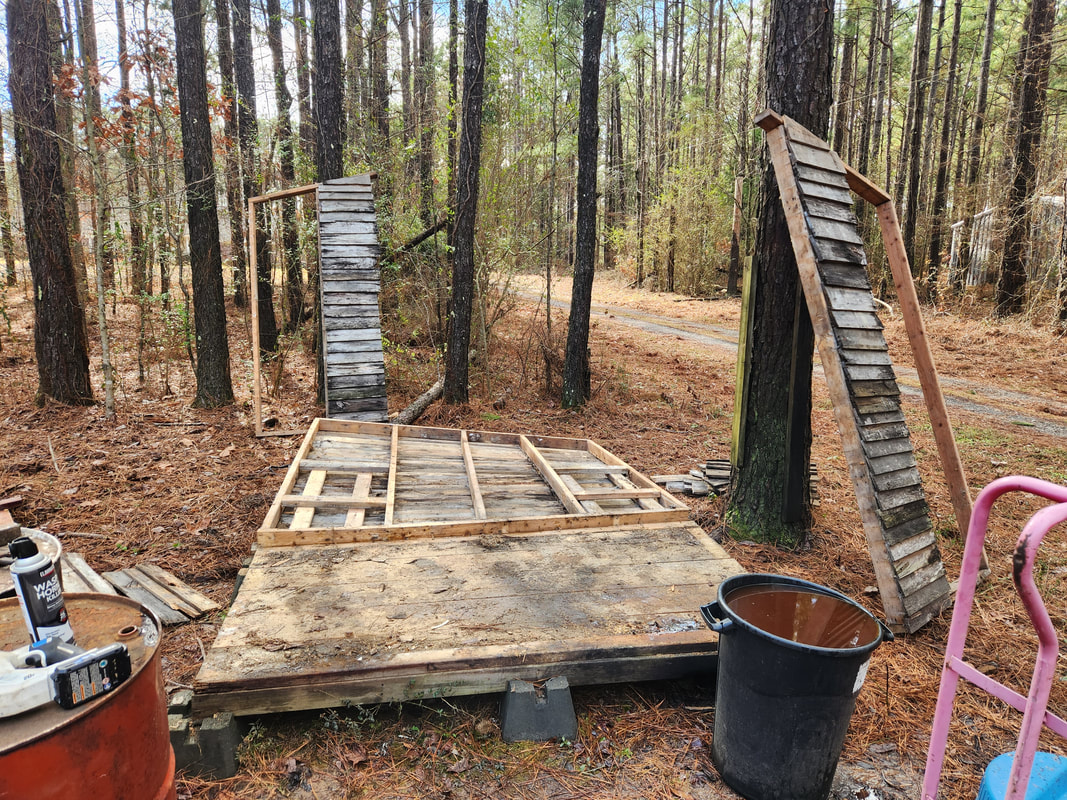
Foundation frame being assembled using a piece of 4x8 plywood as a template.
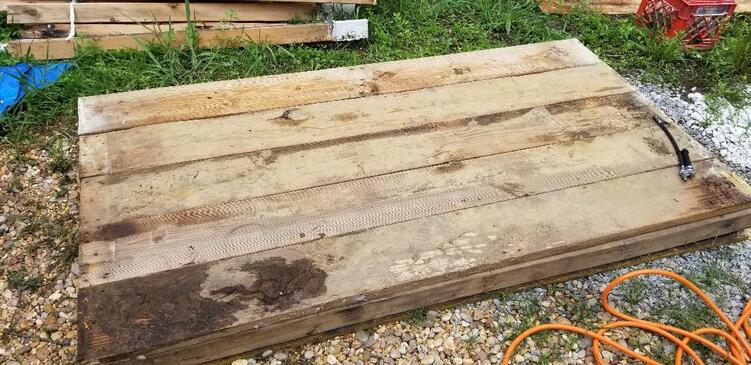
Foundation base completed.
With the foundation base completed I had to do some other things to prepare the area where I plan on building the shed. I plan on setting this thing up in the old dog yard, in the back corner of the yard by the perimeter fence. It'll be nice and tucked away where its not going to get in the way of other construction or other movements throughout the yard. We had to get some foundation blocks, concrete blocks that have a cross notch on the top to hold the dimensional lumber in a foundation frame without shifting. These blocks were staged in the area where I plan on setting up the shed.
The next thing was to prep the yard. I had to remove a bunch of junk we had staged along the fence line to block holes in the chain link fence that the dog had dug in the past. The next thing after getting the junk out was to use some shears to cut down the sapling weed trees that litter the area where I plan on moving up to and including the fuel shed area. With the weed trees gone I was able to bring in a push mower to cut all the grass in the yard to make things nice and neat and keep critters from having a place to hide. Plus with the plans I have for this yard, I can't have any high grass or any clutter in the area. With the grass cut I moved to the chain link fence. I removed the top cable/pipe setup I made to keep the dog from being able to climb the fence then used a hammer to pull the U-tacks from the end of the chain link fence so I can remove the first 8' section of fence to open the area up. With the fence pulled back I will be able to move the foundation base into yard.
The foundation base with the 2x8 boards is very heavy. This thing probably weighs a few hundred pounds. I carefully and slowly stared moving the base towards the dog yard after standing the thing up. I had to turn the base at one point then drag it over some pipes that were staged on the ground behind the storage trailer. Once in the dog yard I got a second wind and was able to get the foundation base over to the resting site. I staged a couple of concrete blocks so as to be able to lay the base down I then added more concrete blocks one at a time until I had all 6 blocks laid out underneath the foundation base. At this point I can not build the studded wall frames and get this shed completed soon as possible.
Shot of dog yard cleared out while standing on foundation base. Note storage trailer in background.
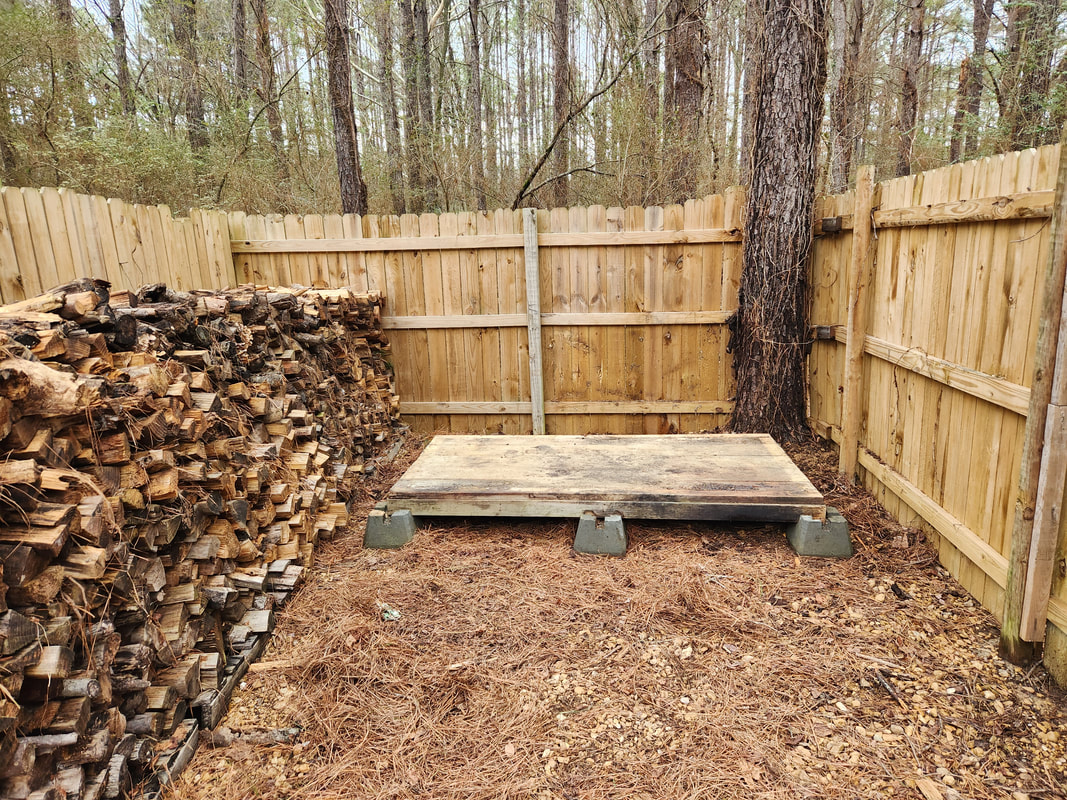
Foundation base set up on concrete blocks in corner of yard.
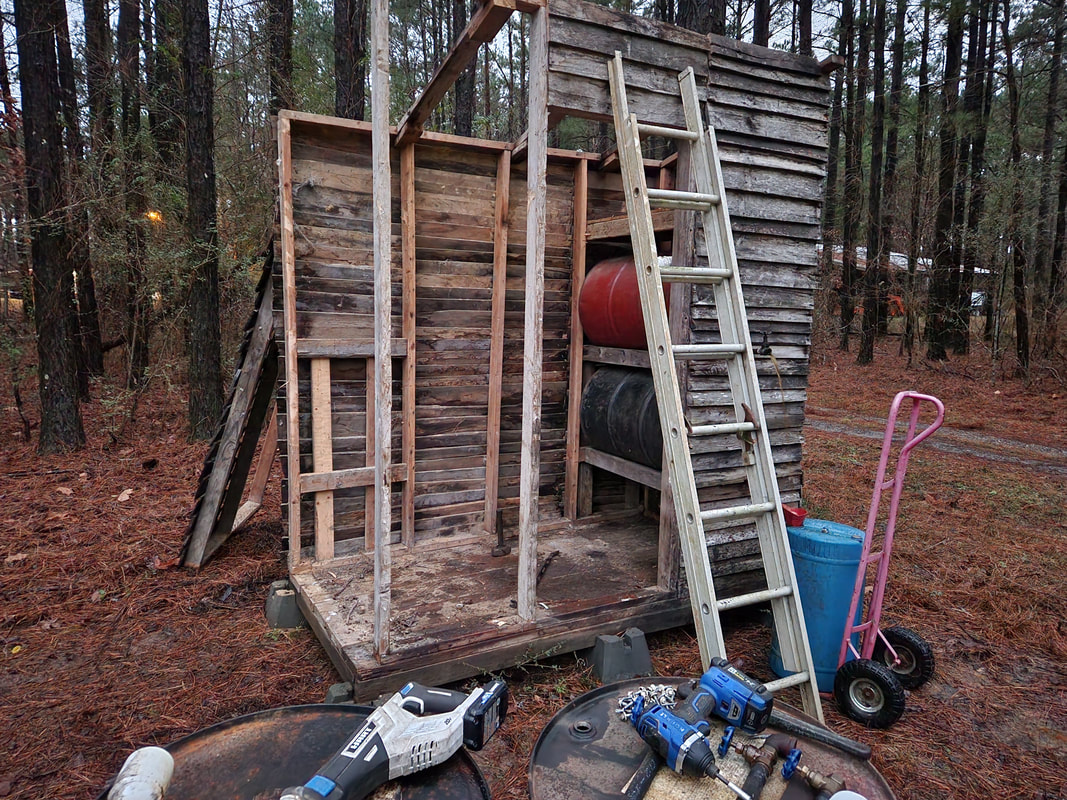
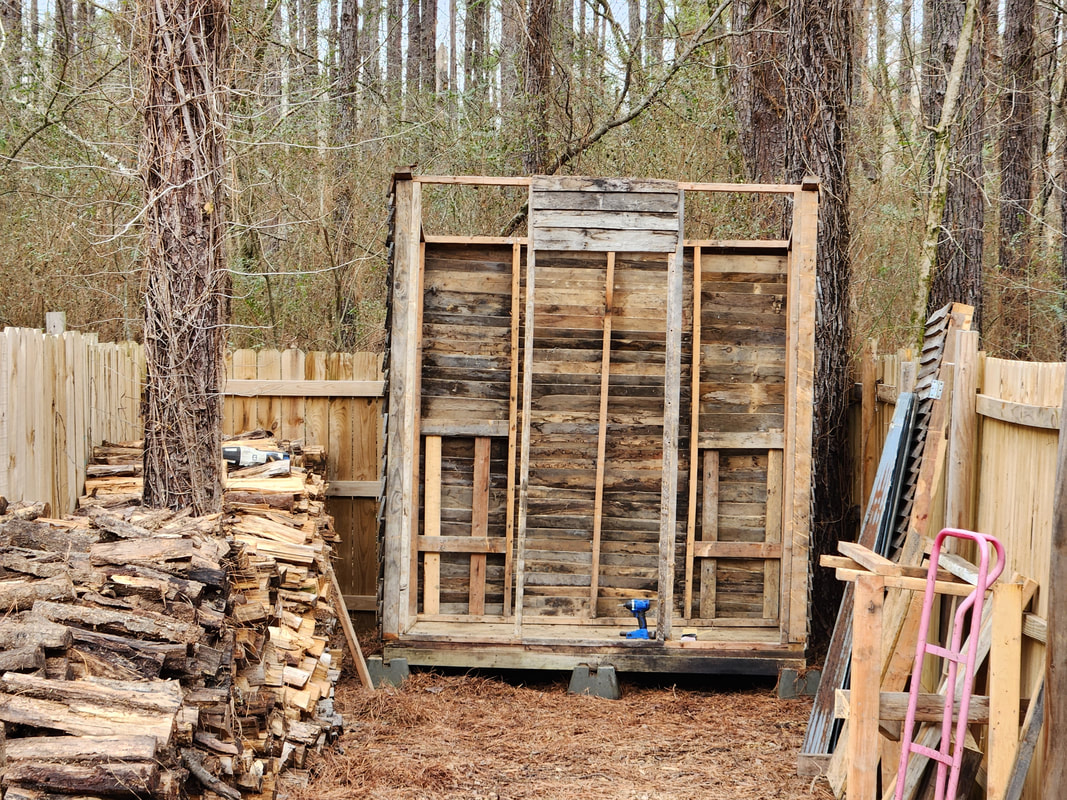
I was able to erect the four walls of the shed over the last couple of days. In order to do that I had to "process" some of the scrap wood. Most of the wood had nails that had to be pulled out and then trimmed if there were ends that were rotted or otherwise worn due to varmints and/or the weather. Afterwards I was able to cut the lengths I needed to throw together the studded frames I needed. I plan on making the shed with a slanted roof to keep things simple so the two side walls will have to have one end stud be shorter than the other so as to create the proper slant in the walls. The front wall frame also needs the inner studs spaced to accommodate a particular sized door. I had to check out the Lowe's website to get the dimensions of their more common sized doors to get an idea of what door I wanted to use and space the inner studs accordingly. Using the nail gun I was able to throw the frames together, stage them on the foundation frame and nail them down to get the complete four walls set up. The only thing now is to add some studs to the top in the proper spacing to allow me to screw down the corrugated sheet metal end to end with maybe an inch of overlap.
I will also make the framework to hold the fuel drums and get those situated and ready to go, along with the shelves for the propane tanks and oil wood buckets too, even before I do the door and plywood walls. This way I can then fully dismantle the old fuel shed and clean that area up as part of my overall plan to condense everything and clean up the grounds as a whole.
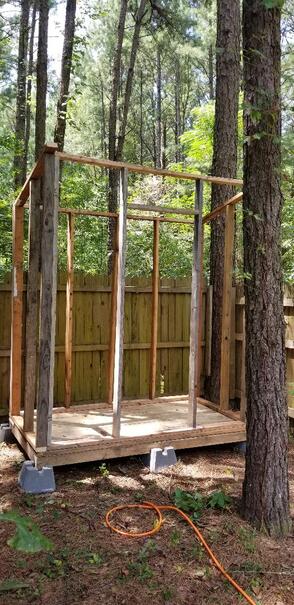
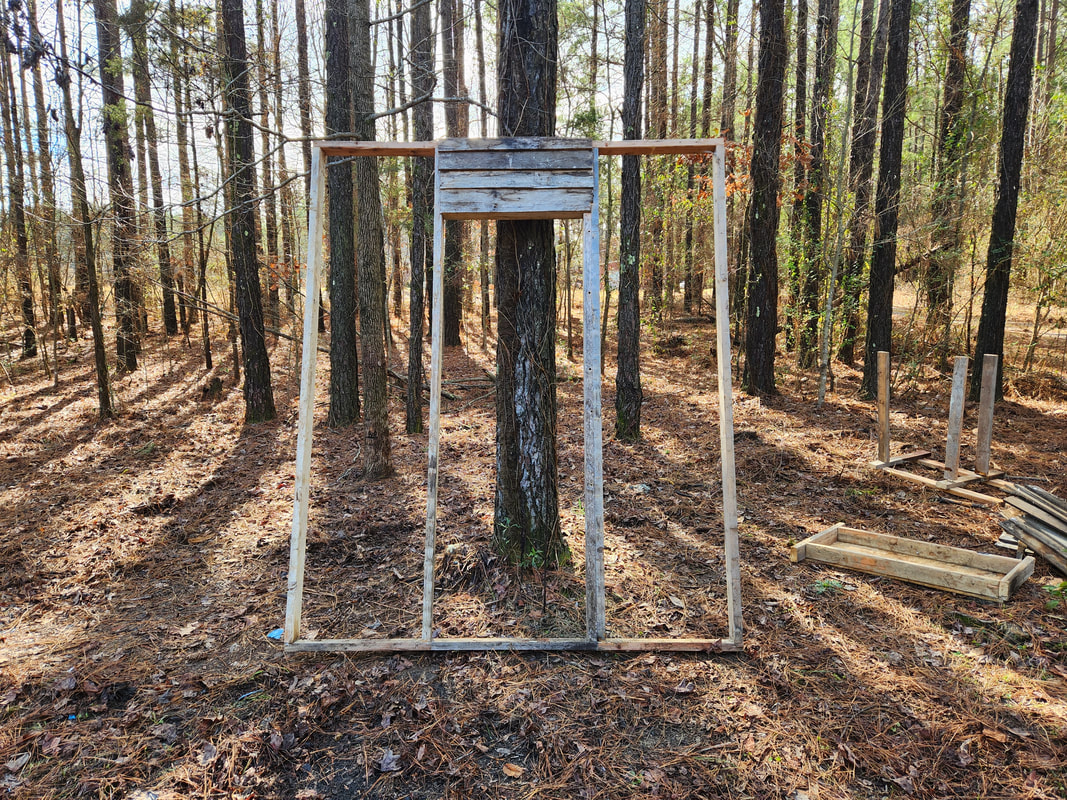
Shot of the completed four framed walls of the shed, note the slant to the back on the side walls, as well as the door frame in the center.
|
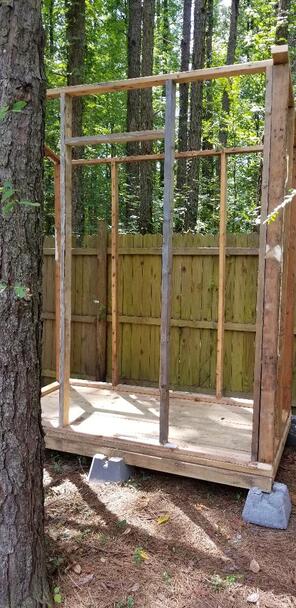
Another angle of the framed shed walls.
|
At this point I've been moving gas from the regular gas drum into the vehicles we've been using in order to use this stuff up. I've been putting gas in on a half tank in both vehicles in order to dilute the old gas enough so that it won't cause any adverse performance issues as its burned. When this drum is emptied it will be the first gas drum to be put in the new fuel shed. I can then transfer the non ethanol gas from the last drum into the drum in the new fuel shed then stack the other drum on top afterwards.
In the meantime after I transferred the kerosene/diesel fuel mix into one drum I freed up two drums which I planned on stacking first in the new fuel shed. In order to do this I measured and cut boards from salvaged 2x4's, then nailed them in place using the shed's studs as the basis of the overall support structure. Boards at the front and back hold two more boards in between that serve as cradles for each drum. The top and bottom cradles are spaced enough to allow for installation or removal of individual drums. Outside rust on these drums might lead to pinhole leaks so we need to be able to swap drums when needed without having to dismantle the walls or the cradles. The last thing I did to the cradles was add four boards, two in the front and two in the back that link the stud boards at the top and bottom. This of course is for added support to hold the 500+lbs of fuel that the two drums will contain.
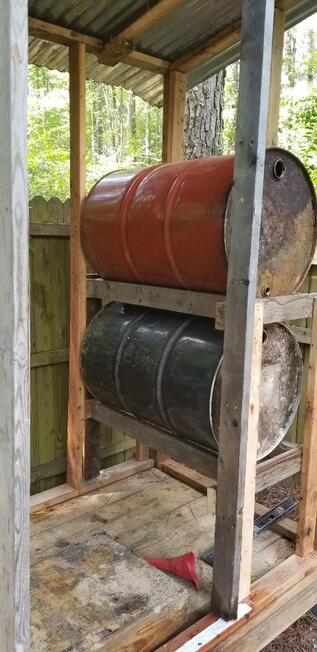
Stacked drums using board cradles attached to wall studs for core support.
|
Stacked drums showing additional support boards linking top and bottom cradles.
|
After getting the extra supports nailed in place I then cut and nailed in place some more 2x4s against the studs a few inches above the top of the top drum. I linked those with some longer 2x4s then measured and cut a piece of scrap OSB plywood from the old shed to make a shelf. The spacing from the ceiling/roof is enough that I'm able to stick a couple of 25lb propane tanks atop the shelf with some room to spare. At this point I turned my attention to the other side of the shed.
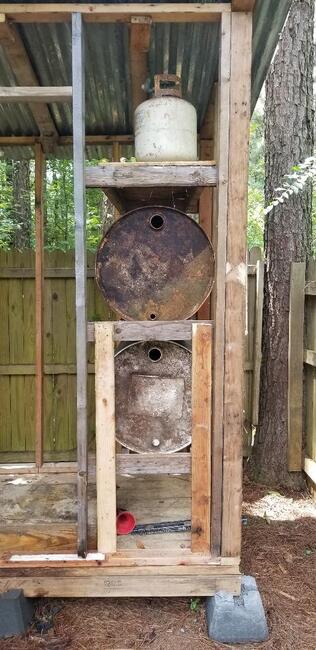
Top shelf mounted with propane tanks stored in place.
Of course since the other side of the shed is going to be a mirror image of the first side, I didn't really have to make any serious deviations from the measurements that I used on the other side. I was able to get everything cut and nailed in place pretty fast for the first drum. After finishing emptying the regular gas drum I set it up on the first shelf. Next I cut the boards for the 2nd shelf and nailed them in place and grabbed another drum I had laying around that was still in good shape. It had some leftover mineral spirits which I drained for use in burning trash. I staged that drum atop the 2nd cradle so now I'll be ready to cut the boards for the secondary supports in the front and back of the cradles.
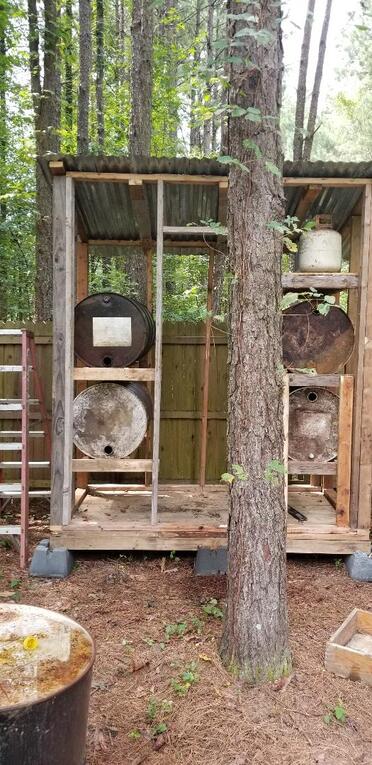
Gas drums mounted in place
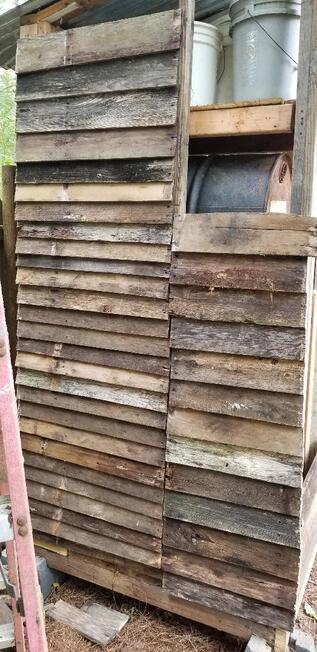
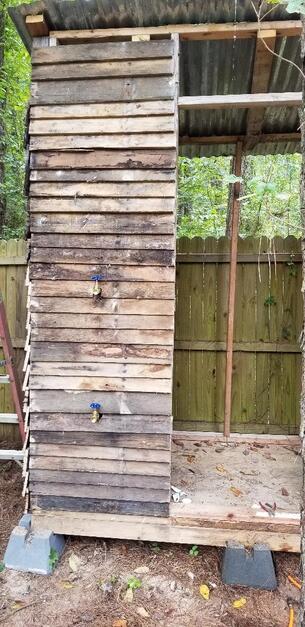
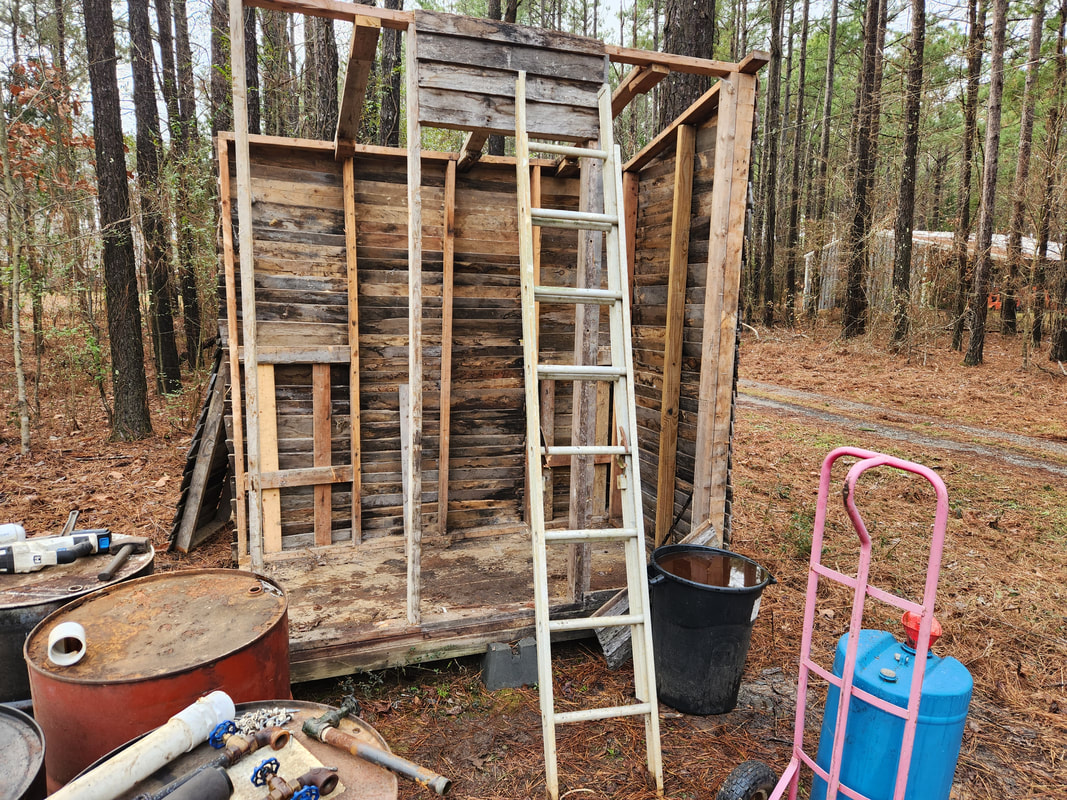
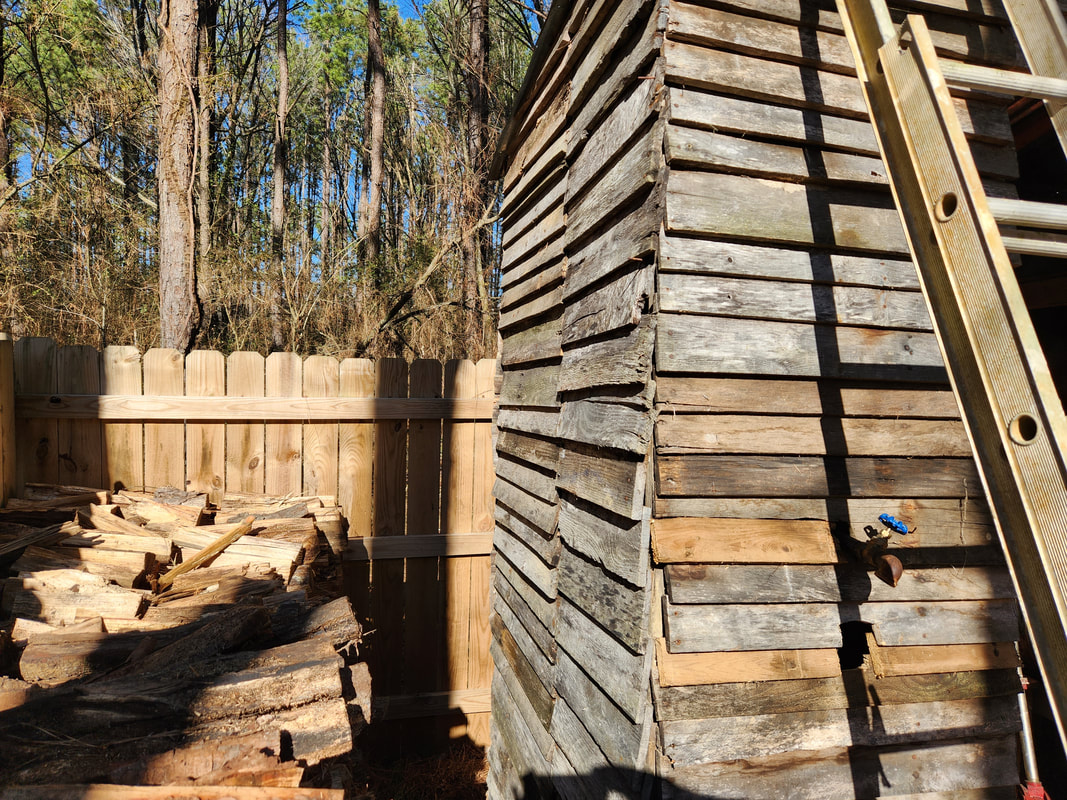
After getting the barrels in place my next course of action is to start putting up walls. Instead of putting up regular plywood boards for walls I decided to try a new idea, which is to cut up pallets and use the pickets or boards from the pallets as shingles to clad the frame and create a siding effect for the walls of the fuel shed. Since I have a lot of pallets stored in the back of the lot, this will allow me to kill two birds with one stone and get rid of a bunch of pallets as well as finish up the walls of the shed. The reciprocating saw with a fine tooth metal cutting blade will make quick work of the nails holding the pallets together and the wood blade will cut up the rest of the boards for future fire wood.
Since the pallet boards are several inches shy of being able to span the whole width of the side walls I had to start the boards at the middle stud and nail them with the excess sticking out to the front and back. I then cut the excess with the reciprocating saw, adding that wood to the firewood pile. Once I clad the wall enough to get up to the lowest point of the slanted roof I had to stop since I will have to cut angled notches in the following boards so as to be able to nail them in place without any gaps. I was able to get the left side of the shed clad before moving on in the next installment.
Since the pallet boards are several inches shy of being able to span the whole width of the side walls I had to start the boards at the middle stud and nail them with the excess sticking out to the front and back. I then cut the excess with the reciprocating saw, adding that wood to the firewood pile. Once I clad the wall enough to get up to the lowest point of the slanted roof I had to stop since I will have to cut angled notches in the following boards so as to be able to nail them in place without any gaps. I was able to get the left side of the shed clad before moving on in the next installment.
Left side being clad in pallet boards.
|
Excess boards trimmed from back end of shingle boards.
|
More excess board cut from shingles at front of shed.
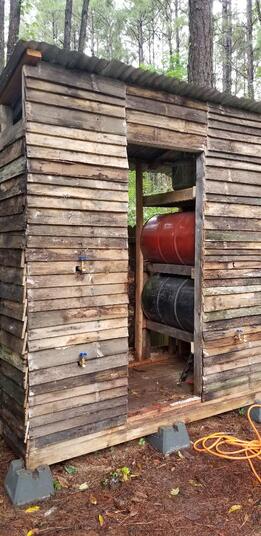
At the front of the shed I had to do things a little differently. Since the fronts of the barrels will have pipes coming out to hold faucets for outputs, I was only able to tack on enough pallet boards from the bottom up to get to the point just before where I would have to cut notches in the next pallet boards for either side so as to provide openings to place the pipes. I did this on both sides so as to get to a point prior to getting the pipes and faucets from Lowes shortly after.
Pallet boards nailed in place up front just before where the pipe will come out of the barrel.
After getting the pipes and faucets I continued chopping up pallets to get the precious boards needed to make my shed shingles. I did go ahead and hit the right side with pallet boards all the way up to the slanted roof eave like on the left side. After getting the boards in place and chopping off more future firewood, I took a pallet board and cut a notch so I can put the first pipe in place on the left bottom barrel and be able to nail more pallet boards up until I got to the top left barrel. After doing the same thing with the next pallet board in order to accommodate the next pipe and faucet, I continued to the top until I ran out of pallet boards and time on that day.
On the right front side I did find out that I put one pallet too many up and was essentially right in front of where the bottom pipe flange is for the bottom barrel. I had to eyeball the board and the pipes estimated location relative to the board so I can drill a pilot hole which would allow me to cut out the hole larger with the reciprocating saw in order to accommodate the pipe. After screwing the pipe in place along with the faucet I was able to stop for the day.
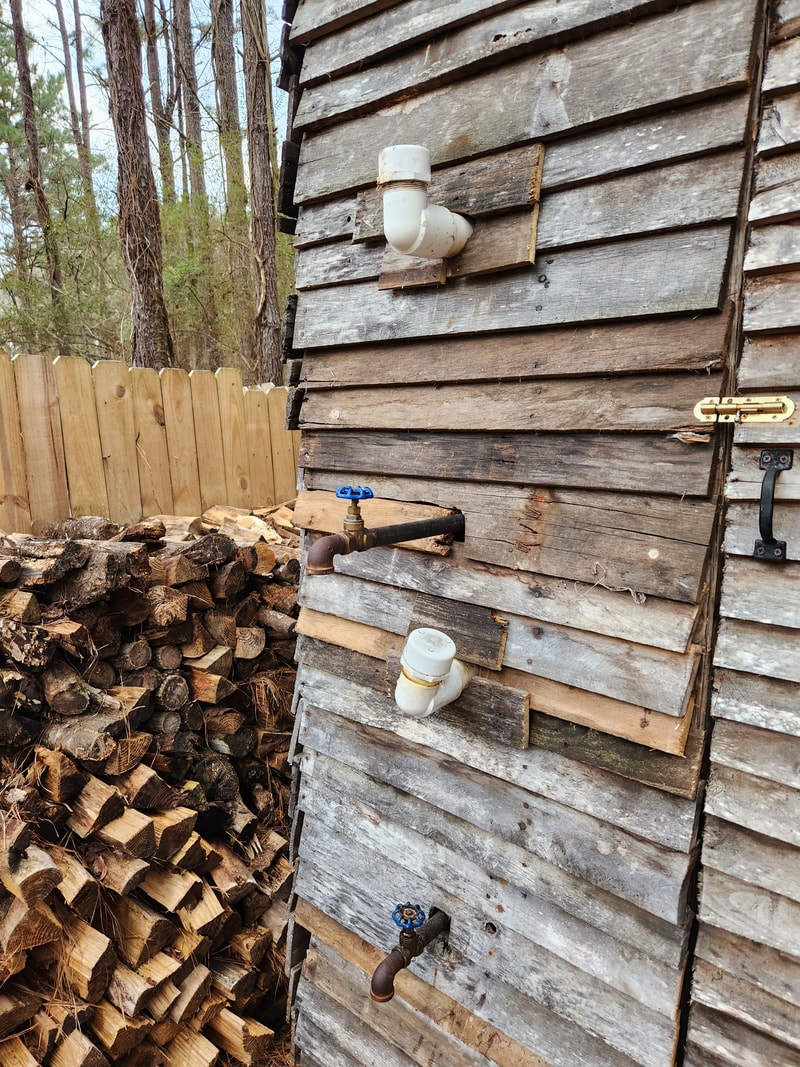
A little note about the faucets. Since the faucets would be holding back gasoline, I had to choose faucets that had internals that are all metal and would have metal on metal contact between the internal parts so as to make for a solid seal to keep fuel from eating its way out like it would on any faucet with plastic or other polymer based material.
Another note is about the top pipe flange on each barrel. These flanges are to serve as the filler ports on the barrels. I am caught between extending pipes out from the top flanges, which are 2" NPT pipe thread, out through the pallet board shingled walls or just putting the right combination of fittings to route the pipes out from the fronts of the barrels to the inside of the shed where I can fill the barrels up while still being inside the shed. I will have to see what kind of spacing the fittings will grant me after putting them in place.
On the right front side I did find out that I put one pallet too many up and was essentially right in front of where the bottom pipe flange is for the bottom barrel. I had to eyeball the board and the pipes estimated location relative to the board so I can drill a pilot hole which would allow me to cut out the hole larger with the reciprocating saw in order to accommodate the pipe. After screwing the pipe in place along with the faucet I was able to stop for the day.
A little note about the faucets. Since the faucets would be holding back gasoline, I had to choose faucets that had internals that are all metal and would have metal on metal contact between the internal parts so as to make for a solid seal to keep fuel from eating its way out like it would on any faucet with plastic or other polymer based material.
Another note is about the top pipe flange on each barrel. These flanges are to serve as the filler ports on the barrels. I am caught between extending pipes out from the top flanges, which are 2" NPT pipe thread, out through the pallet board shingled walls or just putting the right combination of fittings to route the pipes out from the fronts of the barrels to the inside of the shed where I can fill the barrels up while still being inside the shed. I will have to see what kind of spacing the fittings will grant me after putting them in place.
Shot of right side shingled wall of shed.
Left front wall of shed shingled up to top with faucets protruding from cut holes on boards
|
Front right side shingled up to barrel with board drilled/sawed out to allow for pipe
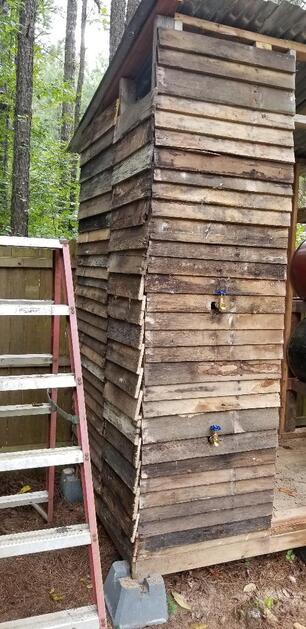
Shot of left side front and side walls clad in pallet board shingles.
|
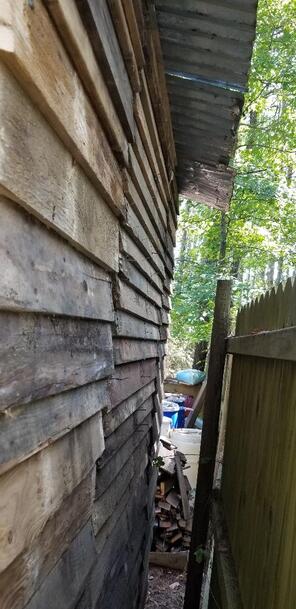
After getting the front of the shed clad in pallet boards I started on the rear of the shed. At the same time I also noted that I'm pretty low on brad nails. At this point I did decide that I need to go ahead and get as far as I can with the remaining nails I had and afterwards I'll be taking a slight break on the fuel shed while working on some other tasks/projects. As usual in this part of the project I had to keep on moving pallets for processing. With regard to the pallet stock, I'm moving pretty good on the "disposal" of pallets. By the time I get the whole f the back clad and the remaining spots at the top of the angled roof, I should've managed to get rid of quite a bit of pallets. This also plays into the idea that some of the pallets due to rot may only yield a few usable boards. At the same time I'll have a shitload of firewood though.
I did manage to clad a third of the rear and about half of another third of the rear before finally running out of nails in the nail gun. One thing that did go down though in the process of nailing the boards up was an accident while trying to hold the board up in the process of nailing it. I misjudged where my hand was or where I had the nail gun at and when I triggered the gun I jabbed my finger with the tip of the nail. My reflexes had me pull my hand back pretty quick. Of course the finger started bleeding from the puncture. I ended up cussing a little while trying to keep the finger from bleeding all over the place. Surprisingly the bleeding did stop pretty fast, enough so that I was able to keep right on working through everything. It wasn't until later in the evening that I took time to look at my finger and realized that what I initially thought was just a spot of blood from the initial puncture was actually an exit wound. Apparently that fucking nail went clean through the tip of my finger and out the fucking side! Of course the finger swelled up some and turned a couple of colors, but oh well, that's the shit that happens when you rush!
Fully clad front of shed.
|
Boards being clad onto the rear of the shed.
|
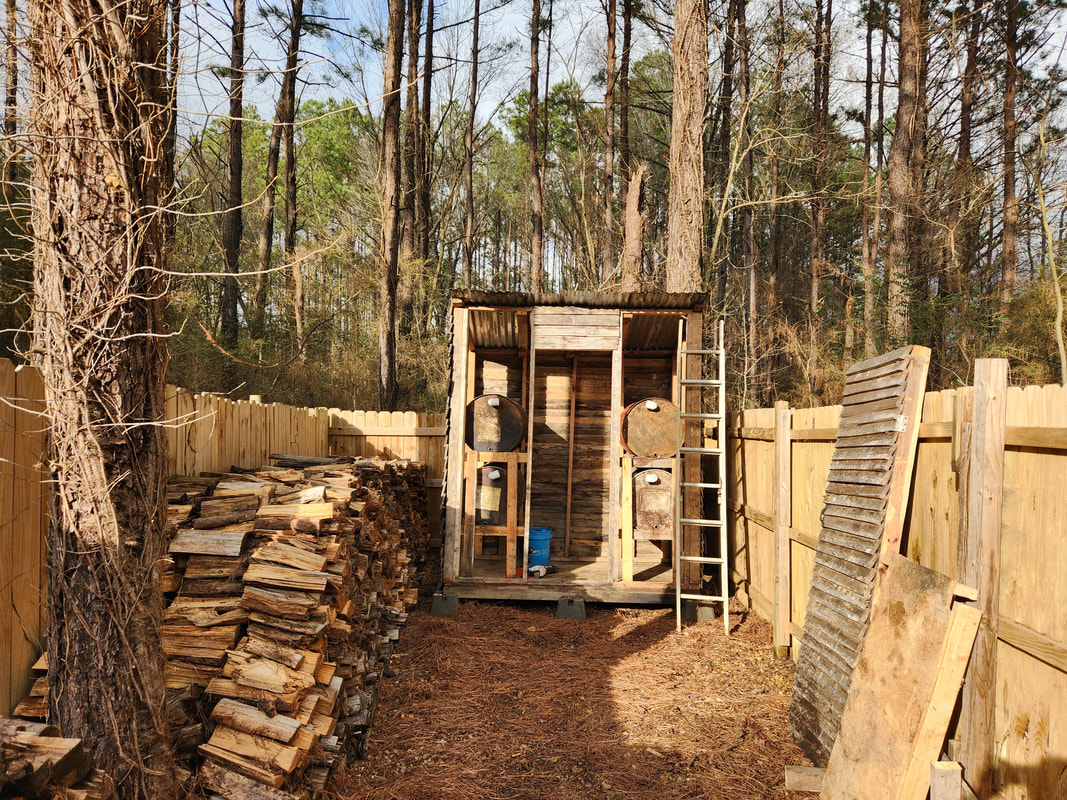
At this point I had to get some more brad nails for the nail gun along with some reciprocating saw blades in order to chop up some more pallets so I can finish cladding the back of the shed. I did move four pallets to the work site beforehand which should yield enough pallet pickets to finish things up. With a couple of days time I managed to cover the remaining two thirds of the back as well as make the few angular cut boards to go at the tops of the sides where the roof angles down. While all in all this part of the project went pretty quickly, I'm still not done yet. I still have to put together the 2" pipe assemblies that will screw into the larger ports on the drums to allow me to fill them with fuel, plus I still have one more output faucet and its associated pipe to put in to complete that part of the project as well.
Another thing I plan on doing is using some of that spray can expanding foam to fill in gaps at the corners and in between the picket/shingles in order to help dry in the shed. I'll probably use some outdoor silicone caulk to assist in the same. Later on I'll go ahead and buy a door to hang in the door way to help complete the shed all together.
Back of shed covered 2/3 of the way with pickets.
Complete left side of shed with angled boards up to roof line.
|
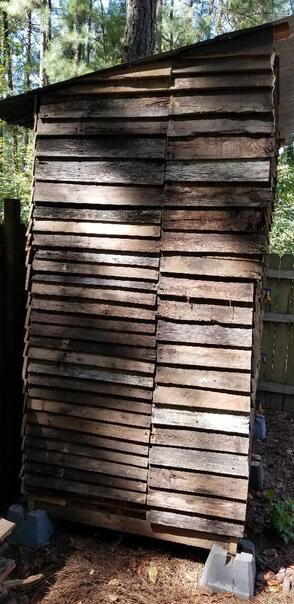
Complete back of shed with pickets all the way up to roof line.
Complete right side of shed with boards all the way up to roof line.
|
At this point I've managed to put together the filler tubes that will allow us to deposit fresh fuel into the drums for use at a future date. These filler tubes consist of 2" NPT PVC fittings and pipe. Because of the way the framing was set up, the top tier drums' filler tubes are pretty simple in setup while the bottom tier drums have a little more complex filler tube setup. The top tier is nothing more than a 90 degree street elbow with a male threaded end and female smooth end. This was screwed into the large port on the drum (4x) then an 18" length of PVC pipe inserted into the fitting. On the top tier a male threaded to female smooth adapter was put on the end of the PVC pipe so a screw on cap can be added. The top tier, again because of how the framing is set up, allows for the pipe to be put at about a 15 degree angle upward so fuel poured in can flow downwards into the drum without overflowing. None of the fittings were glued together mainly because if need be, the pipes can be replaced or otherwise changed around, which would not be possible if everything was glued. I wouldn't even be able to unscrew the elbow from the drum if everything was glued together.
On the bottom tier drums I had to add a regular 90 degree elbow to the end of the long length of pipe, then add a 45 degree street elbow to it, along with a short length (3") of pipe, finishing it off with the male threaded/female smooth adapter and cap. Since the 18" length of pipe is pretty much horizontal, the added fittings and pipe will give some height to the actual point of filling relative to the port on the drum so as to allow for fuel to flow into the drum before overflowing. I'll still have to pour slowly to prevent this from happening either way, but we will see how this works when I do start filling up the bottom drums. I may end up making some updates to this filler setup.
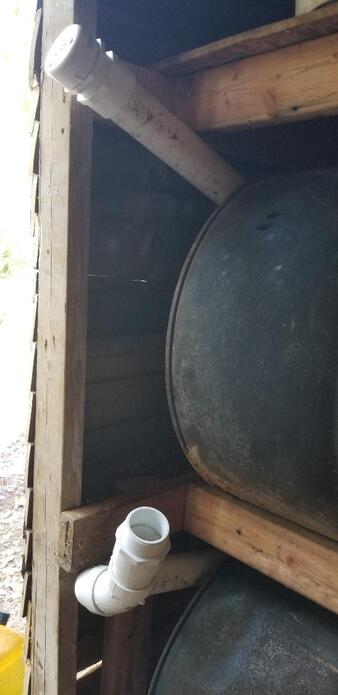
Filler tubes for one set of drums, note angle of top tier and elbow combo for lower tier.
|
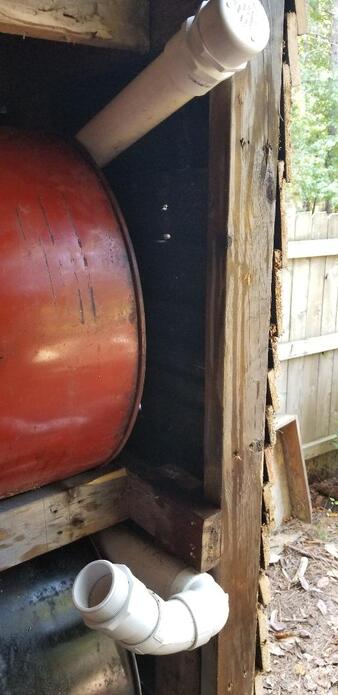
Mirror image of other set of drums opposite first set.
|
With the filler tubes installed I then transferred the fuels from the drums in the old fuel shed into the drums in the new fuel shed. There was one drum that was about 1/2 to 2/3 full of non ethanol gas that I was able to transfer over but it took a while seeing as I had to pump the fuel into a 5 gallon gas can then pour from there into the filler tube. There was a 2/3 full drum of mostly waste veggie oil with some old diesel fuel mixed in that was also in the old fuel shed. Before I put that fuel into a drum I emptied two smaller 30 gallon drums that each was 1/2 full of a WVO/diesel/kerosene mixture and another that was 1/8 full of pure WVO. With all of this mixed together I have the basis of a decent alternative diesel engine fuel or in the worst case, a fire starting fuel for burn piles, etc. I will most likely just cut this mixture with fresh diesel or kerosene before filtering the fuel and using in an engine. With the drums and fuel cans moved from the old fuel shed, it will soon be demolished and the grounds surrounding it cleared for future development.
Another possible change in plans is regarding the door. At first I was going to get a regular door that I can just hang in the doorway and install a knob to be able to have a traditional setup like any normal structure. The ole lady ended up making a suggestion about keeping up with the theme of the rustic look with the pallet board shingles and making a door in the same fashion. I figured it might not be a bad idea since I do have all the materials available for free so I could whip up a door pretty fast and have everything sealed up without spending the $100+ for a commercially made door. I figured I can make a frame out of 2x4's, using the nailgun of course, then break down some more pallets for the boards and tack them to the frame. I could add something like a piece of 2x10 board that I would use for a door handle after drilling out the hole for the hardware. The whole works would hang with regular hinges just like the commercially made door would, but in the end it would keep wiht the rustic theme while saving money and using up the materials I have available at the same time. So at this point I'll be going with this idea.
Another idea I had was for the addition of some shelves at the back of the shed, in the area between the drum shelves. Against this back wall I would have room to store fuel cans that I would actually keep full of extra fuel. What this would accomplish is having that extra capacity for stored fuel while at the same time having fuel already available for routine uses (lawn equipment, gennies, etc) without having to actually use the fuel in the drums. Rotation can still occur as I would fill the cans from the drums when emptied, then just fill the drums with fresh fuel afterwards. With the space against the back wall used for stored fuel and the top used for large propane tanks and oil wood buckets, that still leaves the space under the drum racks, which is about a good foot + in height and the length of the drums. This could go for any number of uses to storing 1lb propane bottles, gallon cans of camping stove fuel, etc. I'll have to think about it a while and I will definitely get back to you on that one!
We are now coming to the home stretch on the project. I went ahead and made a door the way I said I was going to, using salvaged 2x4's from the old fuel shed to make a frame. I used three long boards and two short boards for the top and bottom to make the frame. I then used the pickets pulled from the salvaged pallets from the old fuel shed, nailing them from their ends to one side of the door frame, with the excess hanging over the other side of the frame. The reciprocating saw made quick work of that extra wood, trimming it along the edge of the door frame for a neat edge.

Door frame made from salvaged 2x4's
|

Trimming excess pallet pickets from edge of door frame.
|
With the door done, the next thing I did was nail another 2x4 to one side of the door opening on the shed. The reason for this is because with the way the shingles are at the edge of both the door and the front wall, the door wouldn't be able to open without binding against the edges of the shingles when the door hinges out. This board is bare with no shingles on it, making it recessed compared to the surface of the shingled door and wall. With that I put two 3" hinges on the door using 2" wood screws to ensure the door stays hanging. The door opened and closed nicely because of the door jamb board. With that done I added a cheap door handle on the opposite side of the door and a sliding latch right above it to keep the door secured when closed. With this the shed now has a door to keep it closed from the elements.
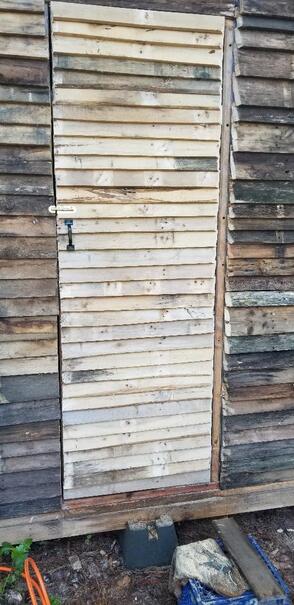
Complete door, note handle to left and latch just above it.
|

Closeup of door jamb board, note gap between shingles on door and front wall.
|
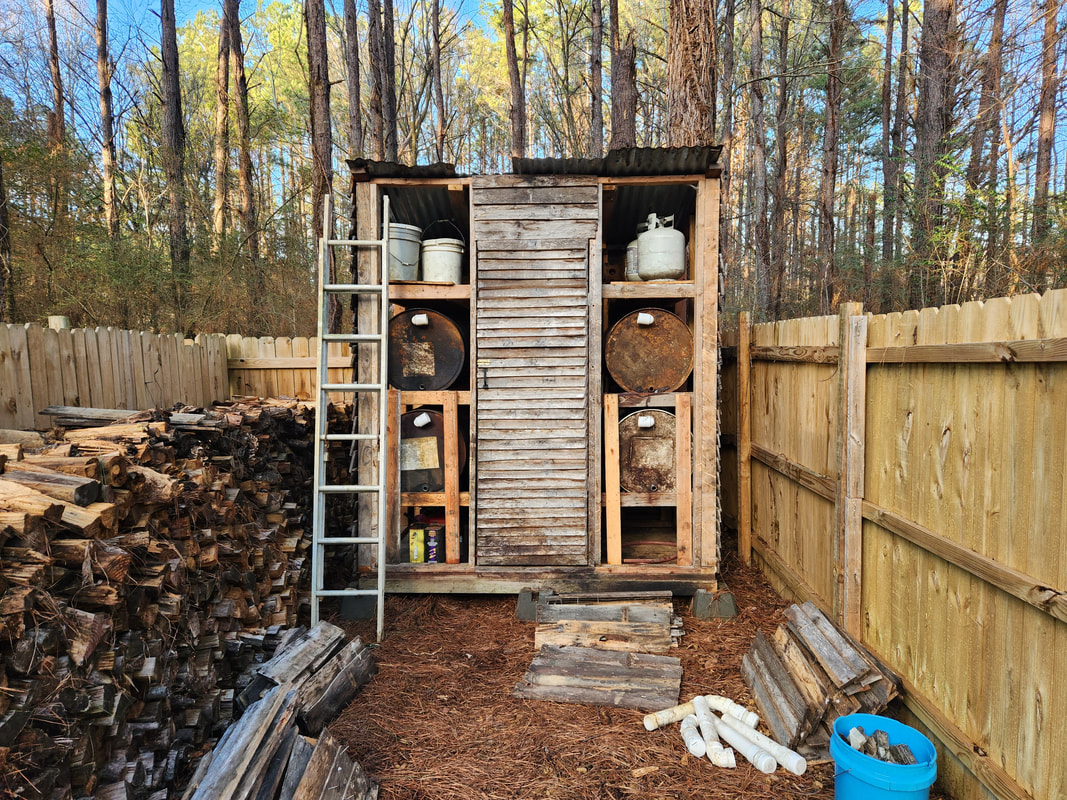
With the door in place the next thing I went to was the shelf idea that I mentioned earlier. This ended up being a pretty simple setup, consisting of more salvaged 2x4 boards. When I go through nailing the boards together I ended up with a long board with two legs and two arms reaching to the back, which were then nailed to the back wall studs. Another arm in the middle was nailed between the wall stud and the front board. This was to help add more support for the shelf surface. The shelf surface is made from more pallet pickets nailed to the top lengthwise (left to right) and butted together to make a solid shelf.
I used some fuel cans to gauge the height of the shelf so I can easily remove fuel cans from underneath the shelf. When I finished nailing the boards on the top, I found that I was able to set four fuel cans on top when I turned them laterally. I can probably do the same with the fuel cans underneath with minimal protrusion from under the shelf.
Extra shelf set up with boards in place, note fuel cans underneath and the clearance necessary for easy movement of fuel cans.
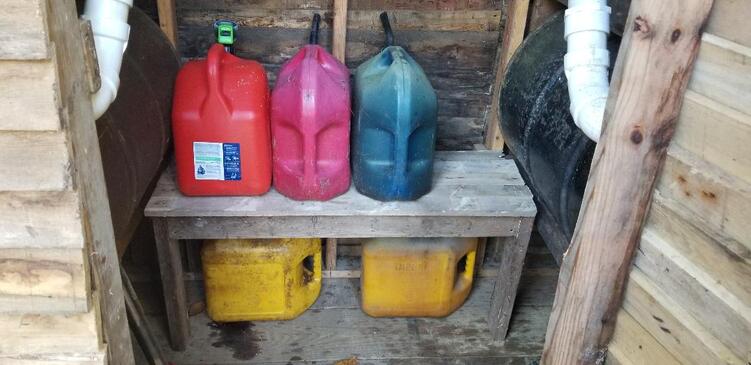
Fuel cans set on shelf with room for one more can.
The reason I didn't make the shelf with vertical boards extending higher up to have two shelves is because with boards extending up past the lower level drums in place where they are, they would not be able to be removed without disassembling the shelving unit. I built this internal set up the way I did to facilitate removal of the drums if I ever had to replace them or if I find some fuel grade plastic drums that I can replace these metal ones with for longevity. With the single shelf it still leaves room to remove the bottom drums easily without breaking anything down. Besides, I don't have that many fuel cans to begin with.
The last thing I really need to do to the fuel shed is add some street elbows to the faucets and maybe add some reducer bushings for smaller pipes to extend out to be able to insert into the fuel cans when dispensing fuel OR, add hose barbs and some hose that can be extended down to ground level, held in place against the front wall to be neat but still allow me to set fuel cans on the ground and fill them with the hose so I won't have to hold the can up to the faucet in order to fill it.
|
|
|
|
|
|
|
|
|
|
|
|
|
|
|
|
|
|
|
|
|
|
|
|
Update:
With the restructuring of the compound as far as the perimeter fence and the cleaning up of the grounds, one of the things that we undertook was the relocation of the Fuel Shed. After moving the fence line in more to open up the area where the Fuel Shed was located, the Fuel Shed was the last thing to be moved to clear the area completely of anything we built or otherwise set up. To take on this endeavor, the first thing we did was drain the drums of gasoline, using the fuel in the vehicles and setting aside the money we would've otherwise used to pay for refueling these drums later. The few gallons of kerosene from one drum were drained into a fuel can and the last drum, which was filled with waste veggie oil, was drained into a mix of 15-gallon drum, a 5-gallon diesel can, and an old garbage can. From here I removed the internals of the shed, the drums, support frames, top shelves and middle bench. All other loose stuff was also removed and relocated. The plan was to move the outer row of our firewood pile, transferring the wood to the inner row and removing the pallets. The Fuel Shed would be rebuilt at the back of the firewood staging area, at the northeast corner of the fence line.
With the area prepped and everything moved from the shed, after removing the internals, we had to pull the pickets from the corners of the walls to allow me to cut through the nails holding the walls together. One row of pickets on the side walls was removed to allow me to cut the nails holding the rear wall to the side walls. The outer rows of pickets on the front wall were removed to allow access to those corners. Of course, the door was removed from the beginning. Once the walls were separated, the next move was relocating the foundation base and its supporting blocks to the new build site. From there the walls, starting with the heavy rear wall, were relocated and secured in place with deck screws. Once the walls were up, the internals went back in, followed by the drums. The roof sheet metal was staged on the roof but not secured, and the top shelves and middle bench were secured in place. The door was hung lastly, but the pickets will be the last thing. Even though we were able to pull pickets off in batches up to five pickets, I will likely have to separate the pickets and tack them back up singly to ensure everything goes together evenly.
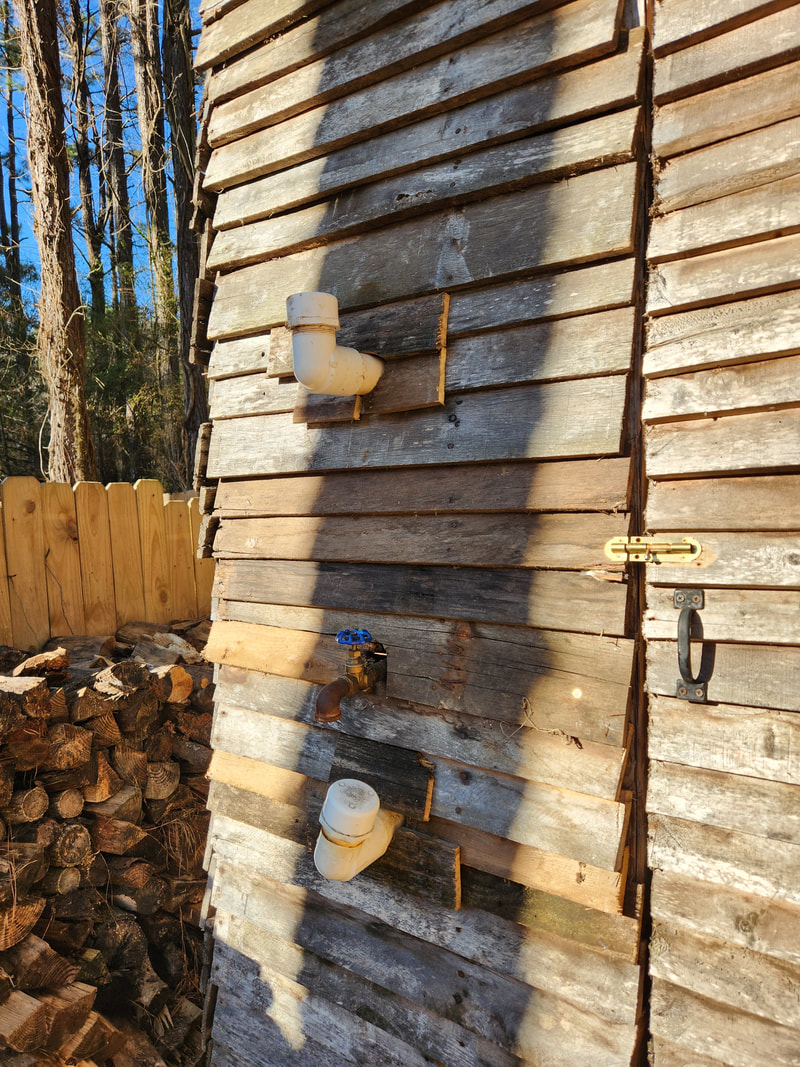
I will make some minor improvements to the structure, like relocating the filler ports to the outside with the addition of extra PVC pipe. The faucet for the top drum will also be extended out so it won't be directly over the filler port for the bottom drum on either side. I'll also add a motorized pump for fuel cans so I can refuel the drums while keeping the can on the ground versus trying to lift the whole can over my head to pour fuel into the filler ports. As for the WVO drum, I will use that drum for straight diesel, hoping to dilute the remaining WVO so it can be safely removed from the drum through regular use. The WVO we pulled from the drum will be stored in the separate vessels until it can be processed into biodiesel and used. Even this plan with the WVO and diesel will make for some future videos with me testing out some diesel heaters I've seen online as well as small single cylinder diesel engines I plan on getting back into once again for use in different applications. These changes being made will make for plenty of new content on the website and the channel so standby for that.
The outer row of firewood cleared from the area and transferred over to the inner row, pallets removed, opening the area up for the reconstruction of the Fuel Shed.
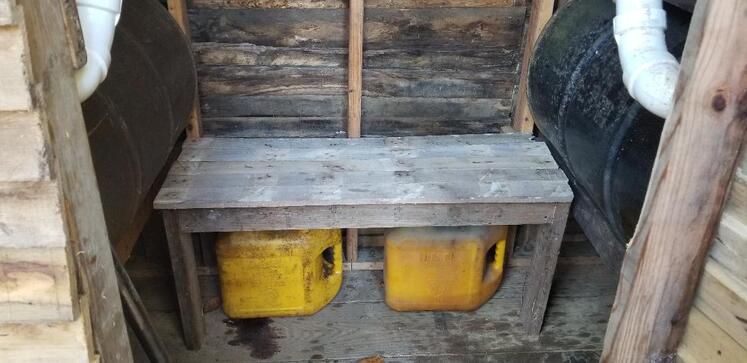
The center bench removed from the middle of the shed after clearing the fuel cans from around this piece.
The main door and one of the drum support frames removed from the shed.
Inside of the shed after removing the drum support frame.
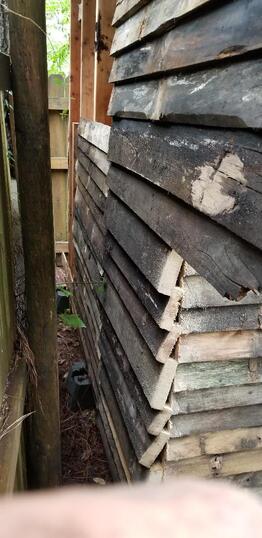
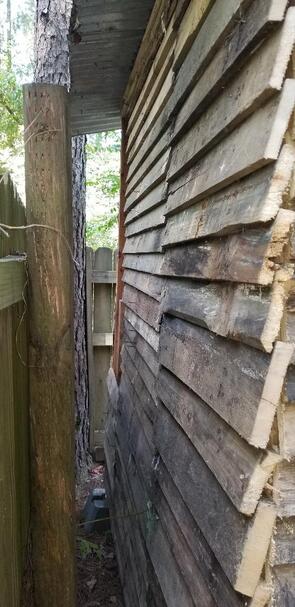
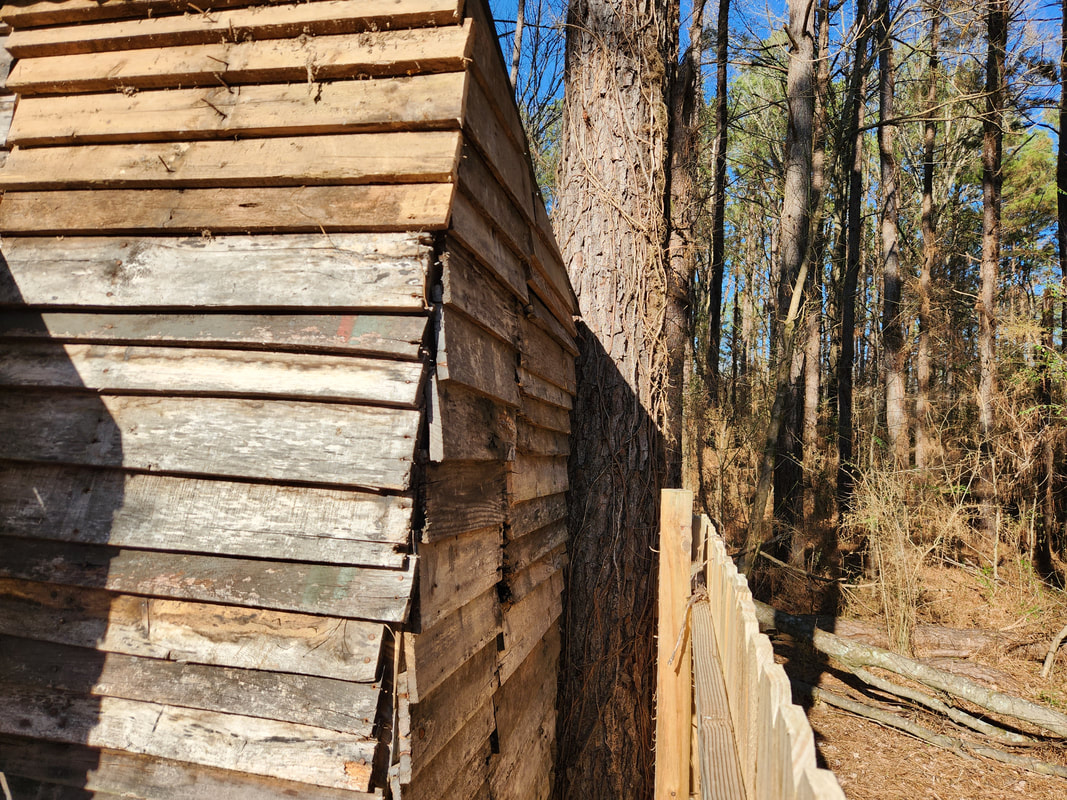
One side wall removed from the shed after pulling pickets from the walls to allow me to cut through the nails at the corners holding the walls together.
After draining the WVO from the top drum to the right, I was able to remove the drums and support frame. The roof sheet metal was also removed.
The separate piles of pickets removed from the walls. Note the top shelf, drum support frame and the drums, along with one of the walls laid against a tree.
The front wall removed from the foundation base after cutting through the retaining nails. Note the internal pieces to the right.
The rear wall, the heaviest of the walls, laid down after removing the last side wall and prying the bottom of the wall from the foundation base. Note the side walls in the background.
The foundation base relocated to the firewood staging area along with the support blocks. This base was very heavy and took some effort to move across the yard over to this site.
The walls of the shed are up, held in place with deck screws.
With the structure frame up, the drum support frames are installed, along with the drums. The roof metal is laid on the top but not secured yet until the pickets are tacked back in place.
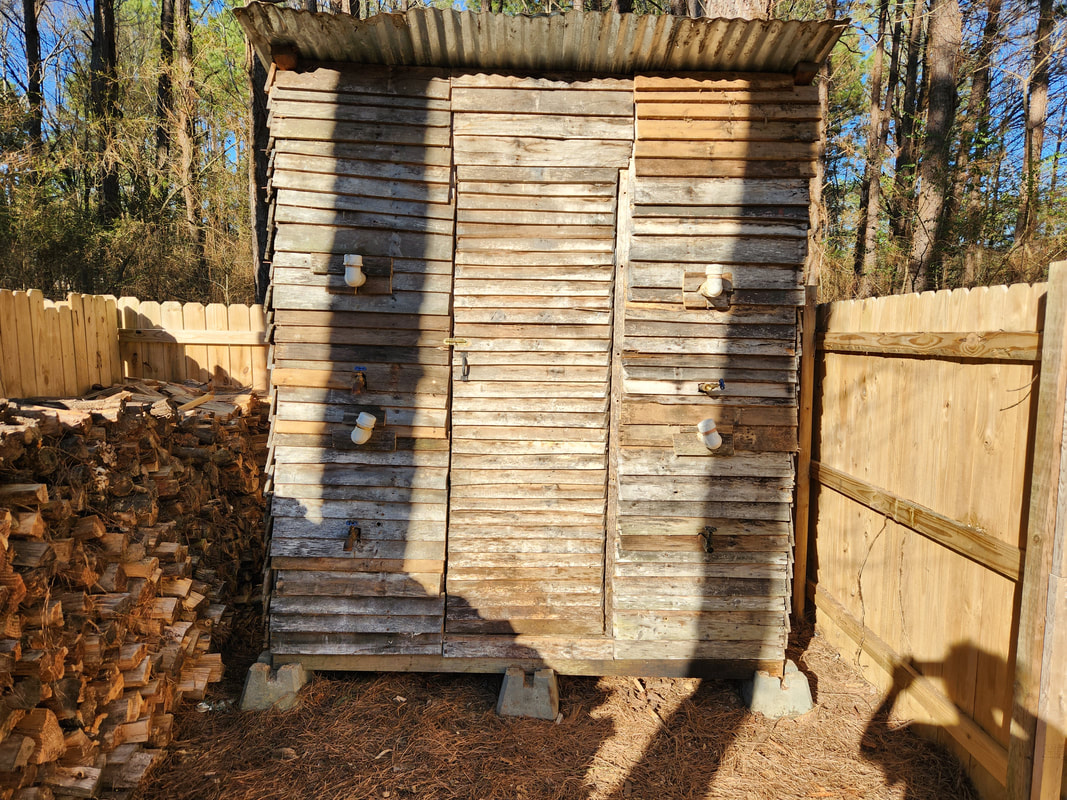
The door is back in place, along with the top shelves and center bench. The oil buckets, propane tanks and fuel cans are all back in place where they were when the Fuel Shed was in its old spot. Note the picket piles staged around the front of the shed awaiting installation.
The left side of the shed with the back row of pickets nailed back in place. The top portion pickets that were cut at an angle and nailed in place first then the board beneath it tucked under to finish the row.
The right side of the shed with its back row of pickets nailed in place.
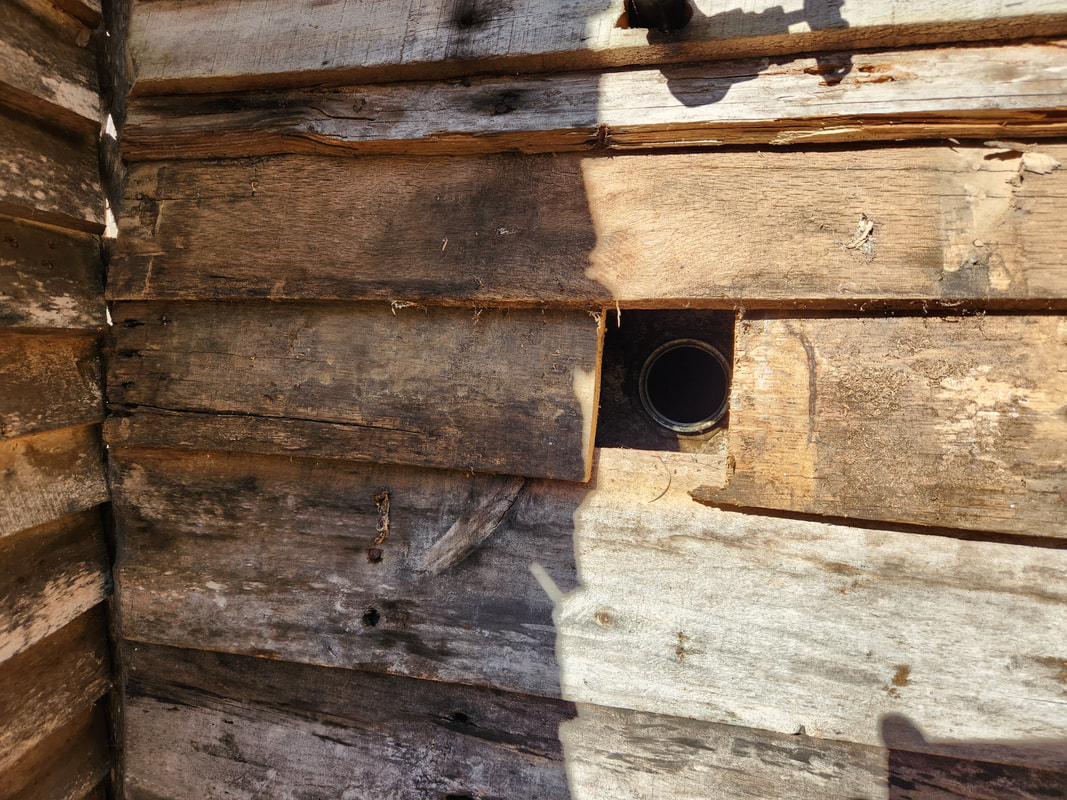
Large hole for new filler port done by cutting a picket in two pieces at shorter lengths to make this opening to accommodate the PVC bushing and length of pipe that will reach out through the wall to the outside.
The top drum filler ports were done by drilling a large hole then sawing out the hole to a larger size to accommodate the 2" PVC tubing.
Small pieces of pallet picket cut to fit around the PVC tubes to close in the gaps around the PVC tubes.
Top drum faucet has a length of pipe with a coupling added to make the faucet reach out past the bottom drum filler tube so the top drum can be used without interference from the filler port on the bottom drum.
