FOUR TIER HYDROPONIC GARDEN
Another field that I'm visiting is the revamping of the garden. I had been trying to do some things like lay down plastic and cover it with mulch to create a surface that will stop weeds and allow me to put beds down without having to worry about grass or weeds growing up around the edges of the beds. This was fine and dandy, I made a couple of beds that I planted a couple of fruit trees in with strawberries to build on the food forest concept. I also set up a couple of beds using an old washer drum and pair of oil drum beds I had made a while back. One thing that the oil drum beds have that any of the other raised beds don't have is portability. If I wanted to rearrange the garden or move it completely, having portable raised beds allows for things to be moved easily. This is where hydroponics shine. A hydroponic garden can be built in a relatively small size yet still be able to grow more veggies than a 4x10 raised bed. Also they can be moved easily.
This is where my first version of a series of new hydroponic gardens comes in. I made a couple of hydroponic gardens using 2 liter soda bottles and PVC pipe 15 years ago that worked rather well. Only problem is over time the thing degraded enough that the bases worked their way loose and even after gluing them back in they're just not quite right. With this in mind, I had to mothball these assemblies until I can figure out some way to re do them in a way where its move sturdy and longer lasting. The revamp of these old assemblies will end up being a new version of hydroponic gardens in my series of assemblies I'll be making. The first version of the hydroponic series is a four tier garden that will be made from some scrap wood and PVC pipe I have stacked on a rack at the back of the work area. I have some 3" PVC pipe that I will use as the planters. I'll drill four large holes in each pipe to place small plastic cups that will be used as the planters. A bucket will be used as the water hopper and will have a pump in it that will pump water up to the top pipe, which will then run down into the next pipe and so forth until it runs back into the bucket.
The first thing I did was make the frame. This consisted of using some landscape timbers for the four legs. Two tall boards at the back and two short boards for the front. Some 2x4's were used to make the frame where I have four cross sections where the pipes were mounted. With the frame made I then moved on to the PVC pipes and prepping them.

Pile of parts gathered for the project.

Hydroponic garden frame put together
I had to take the four PVC pipes and mark them for the four holes I drilled. I used a hole saw to make these holes. After marking the places with a marker I drilled out the holes, cleaned out the debris and test fitted the cups. The cups are small cups, approximately 4 ounces, the type of cups used for mouthwash in a bathroom or something on that order. I took the cups and make a slit/hole with a knife in the bottom of each cup so when the water levels rise in the pipes water will make its way into the cups to saturate the growing medium and the plants.
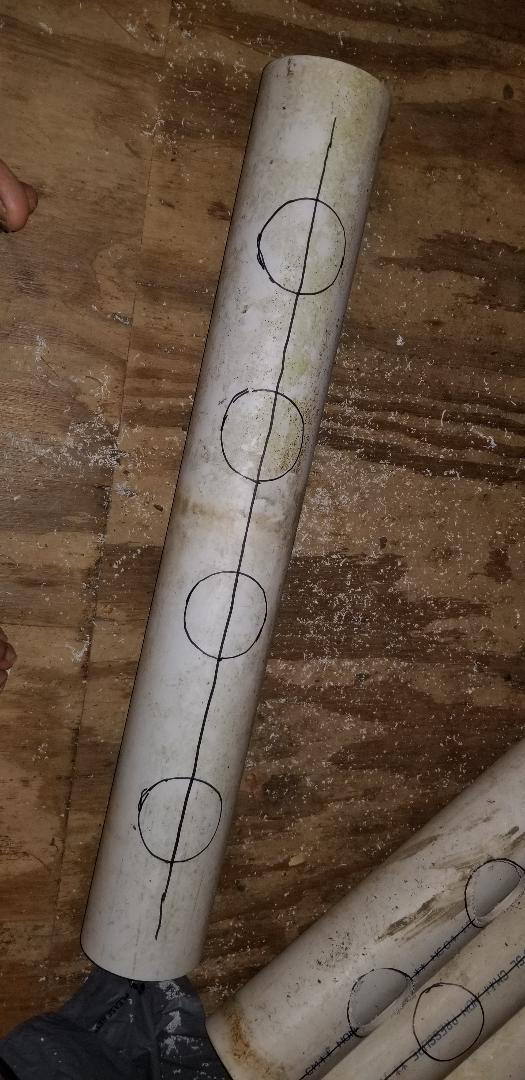
PVC pipes marked for hole drilling

PVC pipes with holes drilled out, ready for planter cups
With the holes drilled for the planter cups, I capped both sides of each pipe with end caps. The next thing was to drill two holes in each pipe for the inlet and outlet nipples. The nipples are 1/2" NPT male thread with a 3/8" hose barb. I drilled one hole at the top on one end of each pipe and another hole on the opposite side of the pipe off to the side about halfway up the side of the pipe. What this will do is allow the water to come in through the inlet nipple then flood the pipe halfway up the inside of the pipe until it reaches the outlet nipple where the excess water will flow out. The outlet nipple on the uppermost pipe will be linked to the inlet nipple of the pipe below it. The outlet of that pipe will be linked to the inlet of the next pipe down and so forth. 3/8" clear hose was used to link the nipples. I used a 1/2" NPT pipe tap to tap threads into the holes then used Teflon tape for the nipples to ensure they seal good when they were screwed into their respective holes.
The next thing done was to attach the pipes to their respective boards on the frame. This was done using some 3" conduit straps that I had to bend the screw hole tabs straight so the straps resembled a "U". Two straps per pipe held them in place on each board. I had to put the straps at points between the planter holes to ensure a secure mounting of each pipe. With the pipes secured I moved on to placing the hoses on the nipples. I ended up finding out that in a rush I ended up drilling and mounting the nipples in the wrong spots on the top most pipe. While it really didn't matter on the other pipes since they were mounted at an angle, the top pipe was mounted on a board that was vertical. The nipple was on the side and on the wrong end compared to the other pipes. I ended up having to bite the bullet and cut extra hose and secure it after linking the outlet nipple from that pipe down to the inlet nipple on the next pipe down.

Garden assembly with pipes secured and hoses installed

Closeup of pipes secured with conduit straps
The bucket was the next thing on the list. As mentioned before, I had a pump that was to go in the bucket. This pump was a simple fountain pump with suction cups to allow it to be secured to the bottom of the bucket. In order to secure the hose to it I removed the smooth plastic hose tube from the pump body and force threaded a nipple into the hole of the pump. With the nipple in place I cut a length of hose that I secured to that nipple and ran it up to the inlet nipple of the top pipe. The next thing I did was drill a hole in the side of the bucket and threaded another 1/2" NPT 3/8" hose barb nipple into the hole on the side of the bucket. From here I installed a length of hose from the bucket nipple and up to the outlet nipple of the bottom pipe.
With the pump taken care of the last thing I did was fill the planter cups with perlite growing medium. In the perlite I planted some spinach seeds, lettuce seeds, and collard green seeds. After turning the pump on I had to make some adjustments. I had to twist the pipes a little to get the output nipples at a level that allowed the water to raise up to a level that allowed the planter cups to take on some water but not allow the pipe to flood to the point of overflowing. I also adjusted the pump rate on the pump as well in order to slow down the amount of water going up to the top of the garden assembly. With that I mixed some fertilizer powder into the water and fired up the unit. I used a bucket lid with a filler port in it to route the hose and the power cord through so I can keep trash from entering the fertilizer water. I still had to do some tweaks, namely clear some trash from the nipples on occasion and make a couple more pipe twists. What I will really have to do is set up things so I can install a timer for this setup so the pump will only run long enough to saturate the perlite but not have enough time to possibly overflow if something does get into the system.
We will see how the seeds grow and ultimately how the whole garden fares in a longer term test. I will install a power grid in the garden to get power to this garden and other future HP gardens as I build more. To that grid I'll install a timer so power can be applied to all the pumps at the same time to save in equipment and lessen the complexity of the whole network. With that, we are off to a start with the new age more convenient and efficient garden layout.
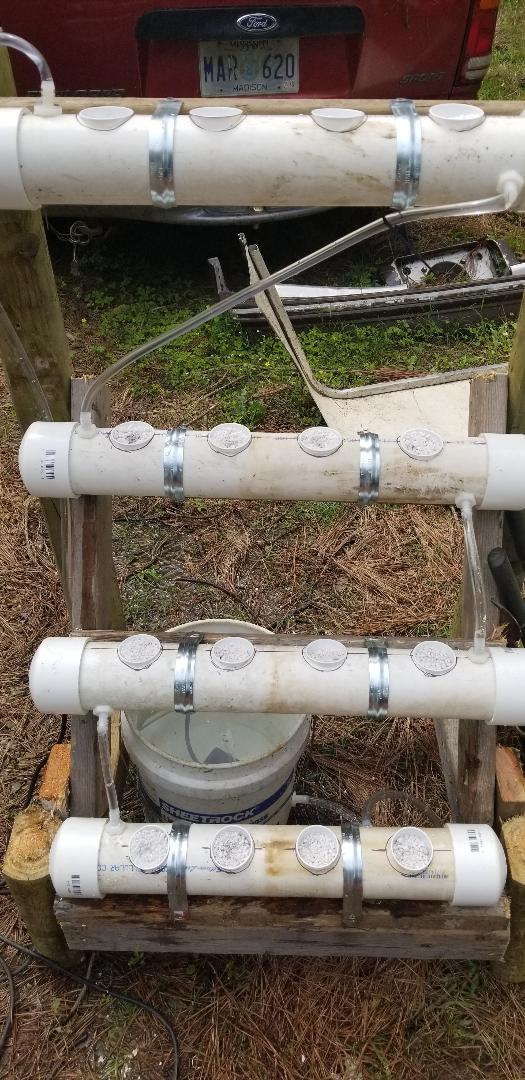
Garden with hoses and pump/bucket installed

Closeup of bucket with fountain pump and hoses/nipple
|
|
|
|
|
|
|
|
|
