CAMPER TRAILER STORAGE SHED
As time progressed on the homestead, more stuff made its way into our overall inventory - tools, car parts, chemical supplies, electrical components, all sorts of shit. As one can figure, this stuff needs somewhere to be stored, somewhere safe, dry and secure. Things couldn't be kept outside or inside large boxes, they had to go inside some type of shed.
Rewind back to 2006 when we built a storage shed that served its purpose of allowing us to remove stuff we had stored in a storage locker from when we first moved down here. Contents changed in the shed as things progressed. A garage was built up by my mother's house that allowed us to move things like tools and car parts and most any other automotive related shit from the shed. The shed was relegated to storing prepper/survivalist items and some miscellaneous home/garden items, along with a gun cabinet and ammo cans full of ammo and other gun shit.
As time progressed more shit made its way into the garage, shelves were built, cabinets added, along with more shit to fill the shelves. At the same time the old shed started to undergo the inevitable deterioration that most wood items undergo with age. The OSB plywood walls got a little weaker, allowing varmints to chew their way into the shed along the bottom. With time more and more material was chewed or otherwise removed from along the bottom of the walls. At this point rats made the shed their home. Multiple rats have been cleared from the shed along with large amounts of rat shit. There was rat shit everywhere, rat shit on top of containers, inside containers, around the bottoms of shelves, everywhere. I had to clean all this shit up several times.
The shelves that I had in the shed also deteriorated with time and got to the point where they needed to be replaced. I also made an active effort to start removing items from the shed, stuff that really wasn't as needed as once thought. Some items were sold when possible, other items scrapped, and other stuff disposed of. With the removal of excess stuff I was able to install two shelves, one a bookshelf and the other a cheap metal shelf, both from 2nd hand stores. Along with those shelves two filing cabinets, also from 2nd hand stores, were installed on one side of the shed to contain prepper/survivalist stuff and miscellaneous home/garden chemicals and a few other odds and ends. Ammo cans were neatly stacked next to the gun cabinet and a plastic 4 level shelf was placed in the corner next to the ammo cans to contain some other odds and ends. Some remaining ammo cans of odd sizes and a few other items were stacked on the far wall straight from the door.
Even with these changes it still didn't change the fact that rats made a home in this shed. Rat shit continues to collect, even after cleaning it up. Also there is the annoying fact that when I'm working on something down at the house and I need something from the garage, I have to walk over 300 ft up to the garage to fetch whatever it is i have to have. This can go on multiple times during a normal work day outside. This gets tiring real fast, especially on hot days. It would be real nice if I could bring all my shit back down to the house and yard where all I have to do is walk a couple of yards to fetch what I want or need then go right back to work on whatever it is I'm working on. Since the storage shed is clearly in need of repair and for all intents too small to contain what I want to store even with the condensation of all our inventory, a new shed would need to be built to accommodate everything.
Since it takes time and money to build anything, I would have to plan everything carefully. The location, size, everything would have to be planned. The problem I have is the idea that wherever I build the shed, that's where its gonna have to stay. If there's any thought of changing the layout, moving the shed will not be an option. At this point I had to think about other options.
At first I thought about things like getting old vans and installing shelves inside for the stuff to be stored. I'd have put multiple vans next to each other to be orderly. After thinking about this, it still felt like it would be a little tacky or "redneck" to do this idea. Another thought was to utilize a trailer, more accurately a camper trailer. The thought would be to gut the trailer of everything and install shelves inside to store everything I need to store. With the right size trailer I can contain all the contents of the old storage shed and the garage in one package.
FAST FORWARD:
I set out with a list of criteria for the donor trailer I wanted. I wanted something ratty, something that would clearly need work or preferably need gutting, even better, something that was already gutted, save me the trouble of having to do demo inside. Even a few leaks wouldn't be a big deal, nothing that some caulk and sheet metal patches couldn't fix. I wouldn't care about appliances or anything, I just want a good shell. I didn't want anything too small, no 12 footers, something in the 20+ foot range.
After a few inquiries I ended up finding a trailer about 90 min from the house. This trailer is a 24 footer, 1988 vintage. It is partially gutted, has a few leaks in the form of openings in the roof from the AC and a couple of vents removed. The tires are good, which would allow me to tow the thing back without incident. The guy pretty much said "make an offer". For shits and giggles I said $200, he said "sold". With that I rented a full size truck and retrieved the trailer. Upon returning to the house I carefully backed the whole rig 300+ feet up the driveway then angled it across the side park and into a nook in a clearing in the yard that places the trailer along the future fence line that runs parallel to the main driveway. This places the trailer across from the garden leaving a good 20ft wide opening between the trailer and the garden that will allow me to build a garage or something similar next to the trailer.
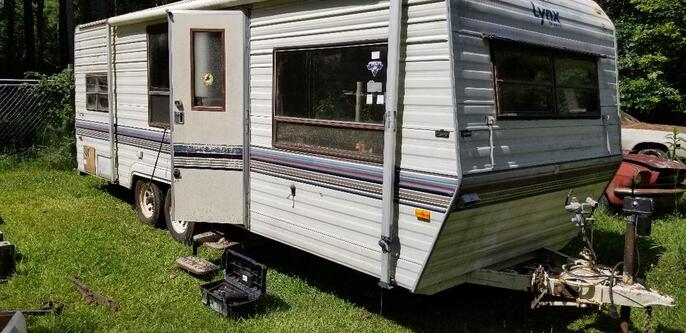
The camper trailer parked in its new home
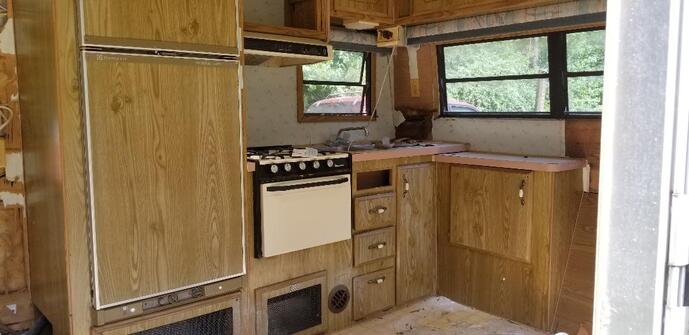
Kitchenette before gutting
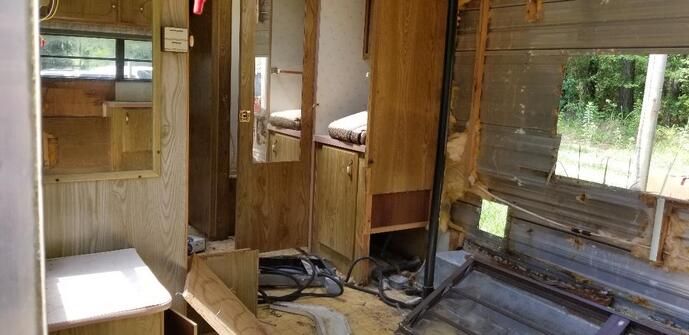
Back half of trailer prior to gutting
After analyzing the area, I made the new plan to build a garage right next to the trailer, almost using the trailer as one of the walls. I will end up pouring a slab next to the trailer then erecting a canopy over the slab, connecting it to the trailer. The canopy would be more or less an awning, four posts, maybe six or 9, holding a frame that would hold a light roof, something akin to a carport but not necessarily a carport, probably using corrugated metal for walls and the roof to save on weight. In the end I just want something big enough to pull a car in and be able to work around it comfortably and be able to have some work benches/tables on the far end. I also want to be able to maneuver an engine crane when needed and not have to push the car halfway out of the garage.
Anyway, back to the trailer. The trailer is partially gutted, the AC unit was removed and was sitting on the floor, along with a microwave and some other loose trash, including the futon. After removing these loose items I continued with the gutting and removed the fridge which I still have to see if it works, along with the furnace and stove. The sink was also pulled. There are still a lot of cabinets throughout the trailer, in the kitchen area, the bathroom/bedroom area and in the middle living area. All of these cabinets are definitely a blessing as they save me needing to add more shelves or cabinets. The cabinets in the kitchen and the nooks vacated by the appliances I removed allowed me to relocate all the contents of the old shed into them. There were only a few larger items that are still not permanently stored. The two filing cabinets are staged in the corner right across from the kitchenette with the bulk of the ammo cans stacked neatly next to them. Several large totes were stacked in the fridge nook and several odd sized ammo cans placed in the nook where the furnace was.
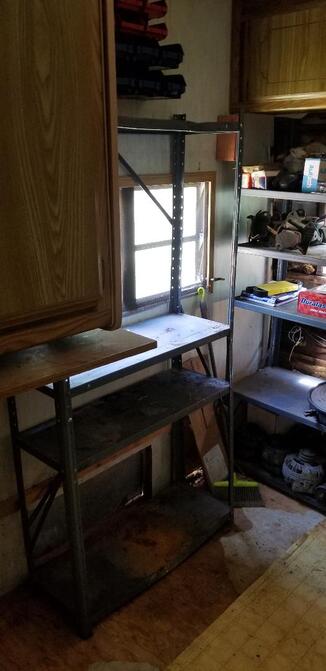
The bookshelf and metal shelf were placed in the central living space right next to the fridge nook. The bookshelf was able to be placed right in the gap between the fridge nook and the fenderwell. In order to place the metal shelf I had to cut one of the legs from the shelf then trim the other three legs enough so that the bottom shelf rests nicely on the top of the fenderwell. I further secured the metal shelf to the studs with wood screws so its nice and solid. This allowed me to contain the remaining crap from the shed, spread out where nothing is stacked on top of each other like it was in the old shed.
The other things that had to be addressed are obviously drying in the trailer. One plan I have is to take one of the 12vdc attic fans I have and mount it over the opening where the old AC unit was. This fan will be powered by a large solar panel that will make this a self regulating cooling system. As long as the sun shines, the panel gets power and the fan runs. The shed gets ventilation when it needs it the most. I used construction adhesive to glue the fan to the opening and secured it with wood screws. The other openings on the roof were patched with sheet metal and glue or caulk and wood screws.
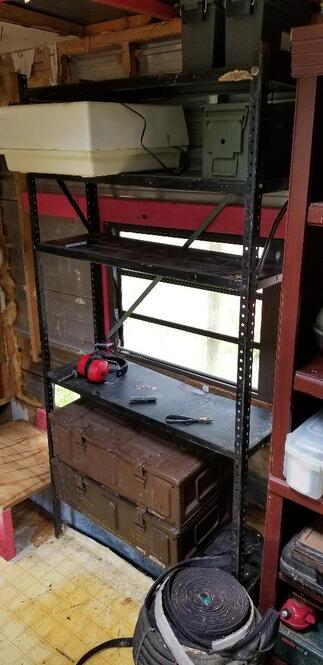
Metal shelf mounted in place next to bookshelf
|
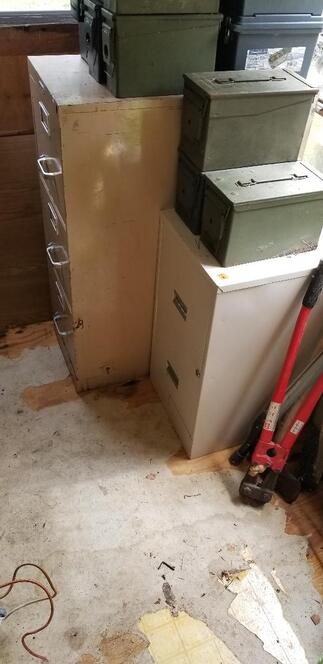
Filing cabinets and ammo cans stashed in corner.
|
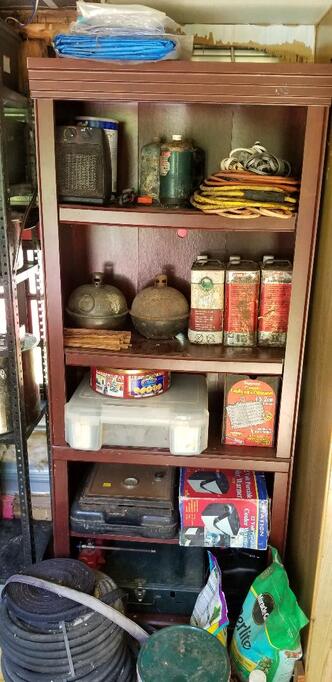
Bookshelf set up for more storage space.
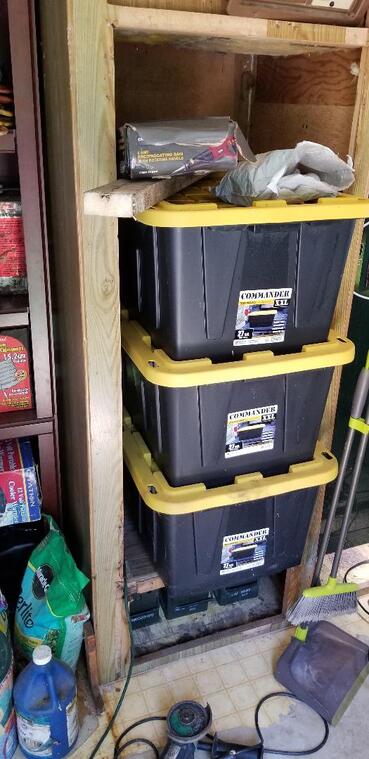
Next to the metal shelf on the left side I made a little wood platform using a piece of plywood cut from the old shed door, along with a couple of short cuts of 2x4s to make a platform that rested on the fenderwell and was supported by the 2x4s coming out. This little platform allowed me to stack up several bulk storage containers, two being large plastic containers and the rest are some 5 gallon buckets that are containing some plumbing pipes and fittings that are small enough to fit in such. Because of the storage of the larger containers I didn't have to build shelving to accommodate more shit within those areas.
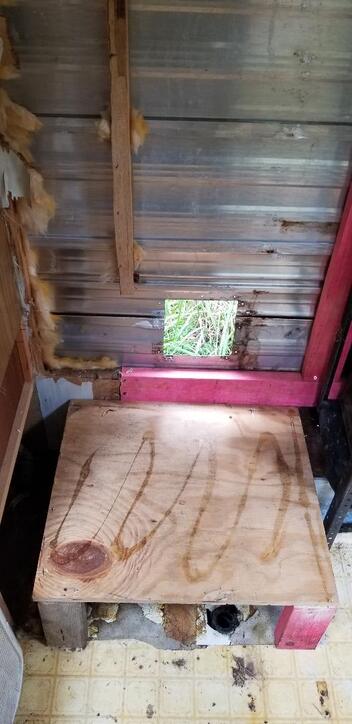
Wood platform made from scrap wood and set up over the fenderwell.
|
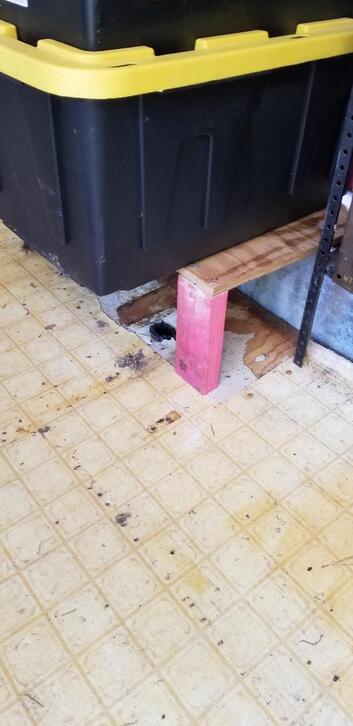
Another angle to the platform holding the bulk containers.
|
As time progresses, I managed to remove more things from the trailer that weren't needed. In the kitchen area I removed the stove and the counter body that was under/around the stove opening. With this new opening I was able to mount the gun cabinet perfectly with little room around it. I was able to secure the cabinet to the floor with heavy lag bolts so its nice and secured. Above the gun cabinet I placed all the camping lanterns that were kept in the old shed.
Another addition to the kitchen area was an extra shelf that was mounted over the kitchen countertop/sink area. I cut a piece of plywood to fit into the sink opening on the countertop then used some 2x4 pieces and another piece of cut plywood, both salvaged from the door to the old shed. This shelf was made to be a little lower than the bottom of the overhead cabinets so as to allow for the storage of items on top while allowing for the storage of stuff on the countertop surface. Utilizing vertical space helped put 2x the stuff within the same footprint of space.
Another addition to the kitchen area was an extra shelf that was mounted over the kitchen countertop/sink area. I cut a piece of plywood to fit into the sink opening on the countertop then used some 2x4 pieces and another piece of cut plywood, both salvaged from the door to the old shed. This shelf was made to be a little lower than the bottom of the overhead cabinets so as to allow for the storage of items on top while allowing for the storage of stuff on the countertop surface. Utilizing vertical space helped put 2x the stuff within the same footprint of space.
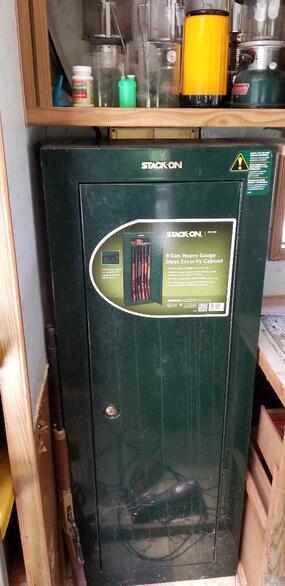
Gun cabinet secured in place, note lanterns on top shelf
|
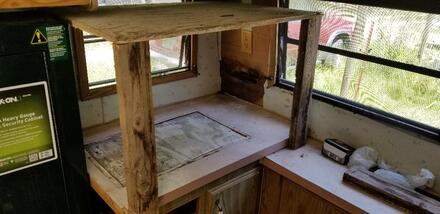
New shelf setup done over kitchen countertop with patch in sink opening.
|
Moving along, I had removed the refrigerator and the furnace from their respective nooks. The fridge was on top of the furnace, both sharing gas lines and power feeds. After taking care of that I closed in the vent hole on the roof with some sheet metal and caulk then took several large plastic containers that are used for bulk storage and stacked them three high in the nook for the fridge. I took several large ammo cans and placed them in the nook under the fridge. This was a convenient setup as it allowed me to store some crap without having to go through any effort to make shelves or modify existing shelving to fit into this nook.
Fridge nook and furnace nook filled with bulk storage containers and ammo cans.
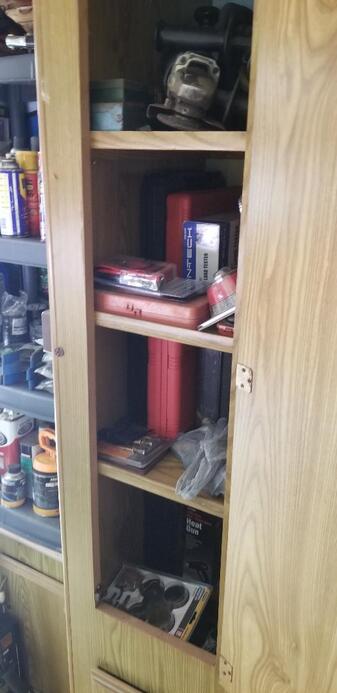
With that done I also utilized the space under the kitchen cabinet to hold all of my bullet making equipment and the bulk lead I had in the garage. Some jars of powder and other shit are also stored in the cabinets under the countertop. With this done I moved over to the middle of the trailer and cleaned up the areas in and around the two storage cabinets on the right side of the trailer. These cabinets are to be used as tool cabinets for the power tools I have. I had to add a couple of shelves in one of the cabinets because it was originally geared for hanging clothes in. Using more plywood and some 1x3 boards for mounts, I was able to install more shelves. This allowed me to store the majority of my power tools and other small odds and ends. Below the shelves I was able to use the little nook cabinets to store even more crap.
Tool cabinet set up with tools
|
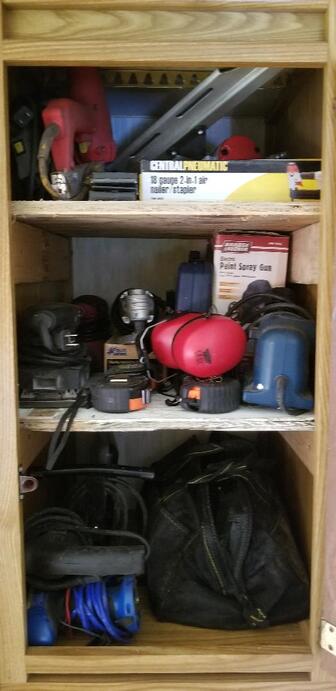
Other tool cabinet with added shelves, stocked with tools and stuff.
|
Next to the tool cabinets I did some modifications to a metal shelf to fit it over the fenderwell on the inside. I had to do like I did with the other metal shelf on the opposite side and cut a portion of the leg off and move the lower shelf up to line it up with the top of the fenderwell. After doing that I was able to mount the shelf and secure it to the wall via the studs. Conveniently, I was able to take this cheap plastic shelf that I had and set it up on the top of the nook cabinet that's over the fenderwell . It actually fit nicely in the space between the metal shelf and the wood cabinets, capitalizing on the available space, allowing me to store yet more stuff. In this case all manner of chemicals were stored on the shelves. Motor oil, tranny oil, brake oil, gear oil and antifreeze were placed on the metal shelf. On the plastic shelf I stored spray cans of adhesive, lubricants and other shit. In this case the other shit was automotive paint reducer and carb cleaner along with bungee cords and wire ties in plastic containers and some other miscellaneous crap. Stuff that I had together on the shelves in the garage were pretty much kept together on the shelves in the trailer.
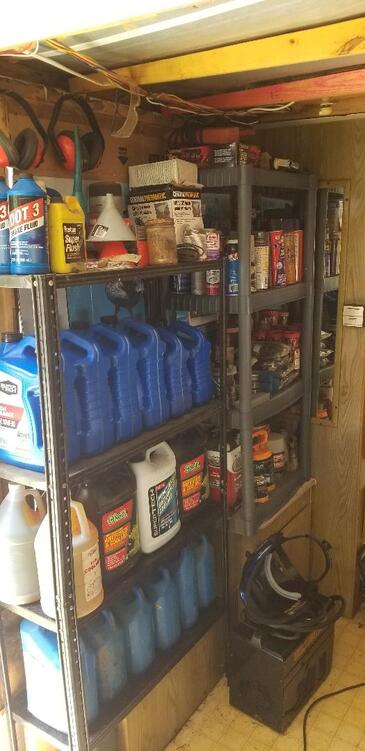
Shelves mounted in place over fenderwell. Note all the items stored on shelves. Also note the nook cabinet at floor level.
The next stop on my travels through the trailer is the bathroom area. Here I started by removing the bathroom sink and most of the plumbing under the sink to make room for more stuff. I also cleaned out the medicine cabinet and immediately stored all our food canning supplies in there. I cut another patch for the sink hole, this time from a piece of paneling that was removed from the trailer earlier. After securing this over the sink hole I then took all my spray paint cans and situated them on the bathroom sink top area. Underneath I put some auto body work tools (bondo spatulas, sandpaper, etc.) and paint buffers. There's still room in the cabinets below the sink top for more power tools other other auto paint related items that I may decide to put in there.
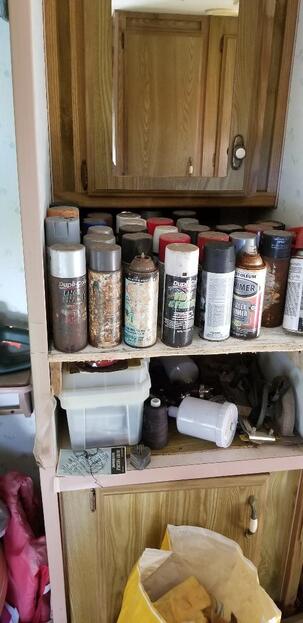
Storage of paints and other supplies in bathroom sink/cabinet nook.
Now we move on to the back of the trailer. In this area I had to cut away some wood frame work that held the futon bed as well as remove the water heater from its berth. I was able to plug the hole where the water heater was with a wood base that used a piece of heavy plywood with some 1x2 boards attached around the edges of the board. This made for a nice hefty patch that I was able to hammer in place for a nice tight fit. In this area there is a small overhead cabinet that I dedicated to storing some tool bags in. I made tool bags for specific applications so if I ever have to do any work that is specific (AC, electrical, etc.) I can just grab that respective bag and have everything I need to perform the work without having to worry about searching out individual parts or tools or other components. Anyway, these bags are stored in the overhead cabinet.
I took another metal shelf from the garage and set it up in the corner right under the overhead cabinet and anchored it to the wall. This shelf is to be used for storing the auto parts I have that are used on the vehicles in our fleet. I removed the top shelf on the unit and reattached it between two shelves where there was a wide gap. This allowed me to be able to have a new top shelf that has plenty of room to store parts while adding a shelf midways down to serve as more storage.
On the right wall next to the tool cabinets I set up another metal shelf for more automotive storage, but with a twist. I removed the shelf that was just under the top shelf, leaving a gap of a couple feet between the top shelf and the next shelf down. The reason for this will be to make an organizing rack incorporating soup cans attached to 2x4s mounted crossways at the back of the shelf and at a slight angle, to keep the contents from easily falling out. This will allow me to store bulk things like relays, clips, bulbs, any small stuff that I have a bulk of and would like to have organized for better access.
On the shelves below I placed more miscellaneous automotive crap, keeping to the sectioning off of the trailer. Right above the shelf I mounted a commercially made parts organizer rack that utilizes little plastic bins that hook to a wall board. These will be used to organize hardware (nuts, bolts, washers, screws) by size. This will eliminate the dreaded bolt buckets that most of us have either grown up with or still have in a corner of the garage. I have a love/hate relationship with those damned things because while they're good for containing loose bolts and other hardware I come across, I never get around to sorting that shit out and when I actually need a specific size piece of hardware I spend more time searching out that one or two damned bolts than I do actually putting those bolts in place to fix the item I'm trying to fix. So yep, organization racks all the way!
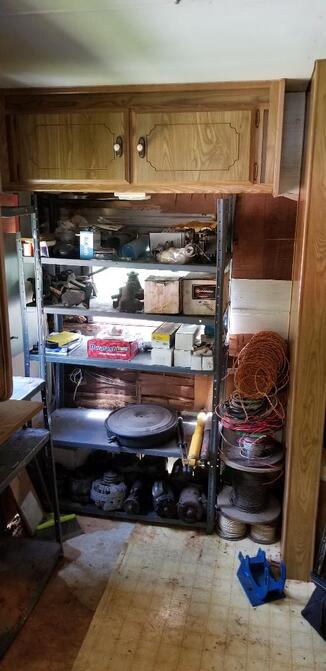
Auto parts shelf at back of trailer, note all the automotive shit stored.
|
Shelf set up next to tool cabinet, between parts cabinet.
|
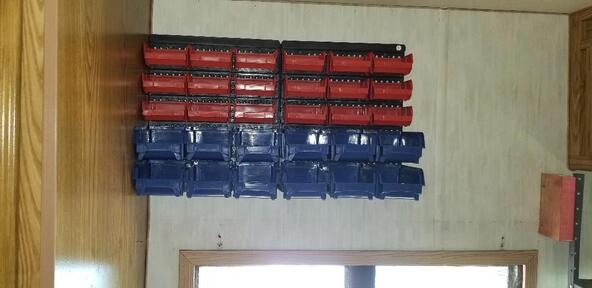
Hardware parts rack mounted on wall ready for use.
|
|
|
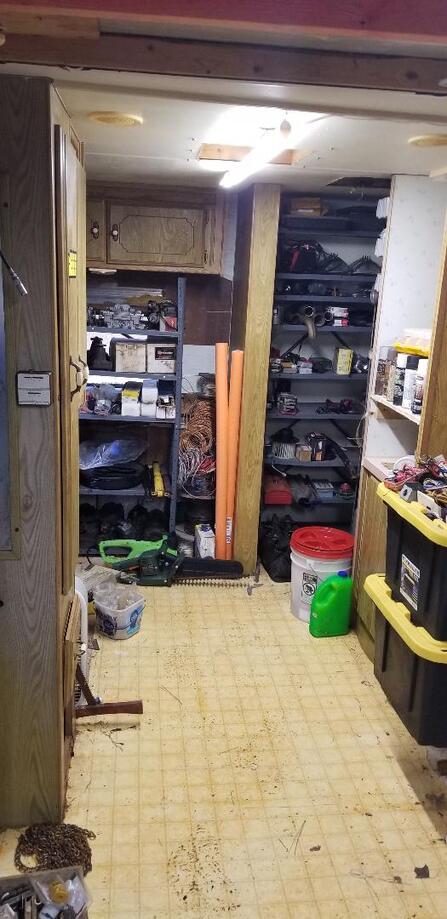
After the initial work that was done to the camper trailer storage shed, a brief span of time passed. There were still some things I needed to do, perfect or otherwise finish on the unit to make it more complete. The first thing was installing interior lights in the trailer so I can see what I'm doing when I'm inside looking for crap. At first I was going to try and find some 12vdc LED lights I could mount and directly power from an on board 12v solar charged power system but then after seeing the selection of 12v LED lights not really being to my satisfaction as far as light output or cost I went ahead and just settled on the faux fluorescent style LED fixtures that are available everywhere for a pretty cheap price. These lights mimic the single bulb fluorescent shop lights we used to use 15 years ago but with the output of a twin bulb unit. I got a couple of these fixtures and hung them in the trailer, with each light covering one half of the trailer. The included chains that are used to hang these shop lights served perfectly with some wood screws to hold the fixtures tightly against the ceiling of the trailer so they aren't too low nor otherwise swinging where they can be hit by my big head.
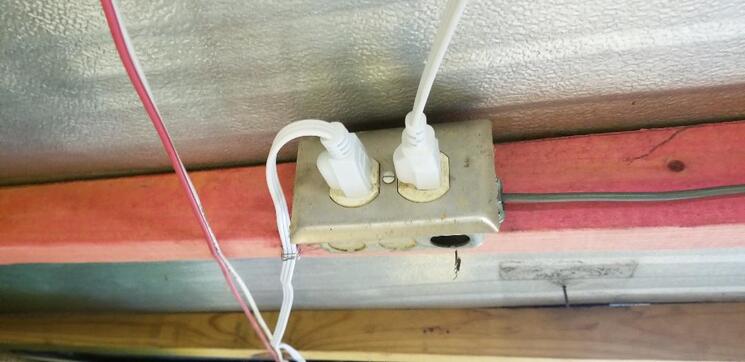
The next thing I did was install a single outlet box on the ceiling mid ways between the two fixtures. I used the staple gun to tack up the power cables from both lights to the ceiling joists until the plugs were right by the outlet box where they could be plugged in, fully securing the cables along the ceiling. Next was routing a two conductor cable from the outlet box along the ceiling over to the outer wall near the door. Here I mounted two electrical boxes. One was another outlet box and right below it, coupled with a solid pipe connector, was a switch box. I installed a male plug to the cable and plugged it to the outlet box. Afterwards I drilled a hole in the outer wall right next to the outlet box. Here I fished a short power cable/plug that was removed from a dead appliance through the hole from the outside. The bare end of the cable went over and into the outlet box where one side of the cable went to one side of the outlet and the ground went to its respective spot on the outlet. I took the other side of the outlet and ran it down through the coupling and into the switch box, connecting it to the switch. The other side of the switch got a short piece of wire that connected it to the other side of the power cable inside the outlet box. This way with the lights plugged into the outlet box, they can be switched on from the switch box right at the door. The outlet box does provide for an extra outlet if I need to plug an extension cord to it for power tool use from the trailer. Of course the switch will have to be on but for the time being that is a minor inconvenience.
The next thing I did was install a single outlet box on the ceiling mid ways between the two fixtures. I used the staple gun to tack up the power cables from both lights to the ceiling joists until the plugs were right by the outlet box where they could be plugged in, fully securing the cables along the ceiling. Next was routing a two conductor cable from the outlet box along the ceiling over to the outer wall near the door. Here I mounted two electrical boxes. One was another outlet box and right below it, coupled with a solid pipe connector, was a switch box. I installed a male plug to the cable and plugged it to the outlet box. Afterwards I drilled a hole in the outer wall right next to the outlet box. Here I fished a short power cable/plug that was removed from a dead appliance through the hole from the outside. The bare end of the cable went over and into the outlet box where one side of the cable went to one side of the outlet and the ground went to its respective spot on the outlet. I took the other side of the outlet and ran it down through the coupling and into the switch box, connecting it to the switch. The other side of the switch got a short piece of wire that connected it to the other side of the power cable inside the outlet box. This way with the lights plugged into the outlet box, they can be switched on from the switch box right at the door. The outlet box does provide for an extra outlet if I need to plug an extension cord to it for power tool use from the trailer. Of course the switch will have to be on but for the time being that is a minor inconvenience.
Overhead outlet box for shop lights in trailer.
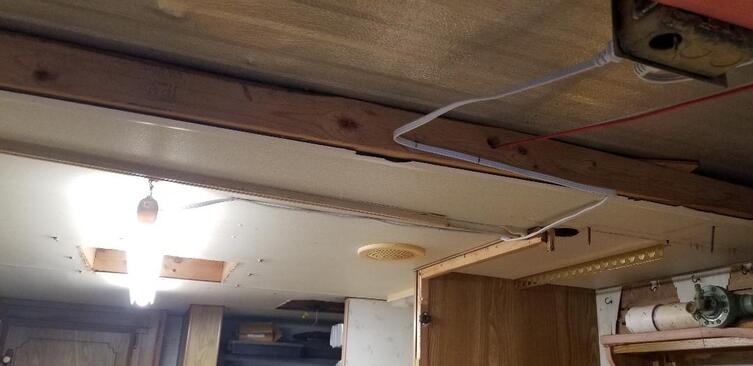
Shot of rear shop light in trailer, note cable routed from light along ceiling with outlet box in upper right corner.
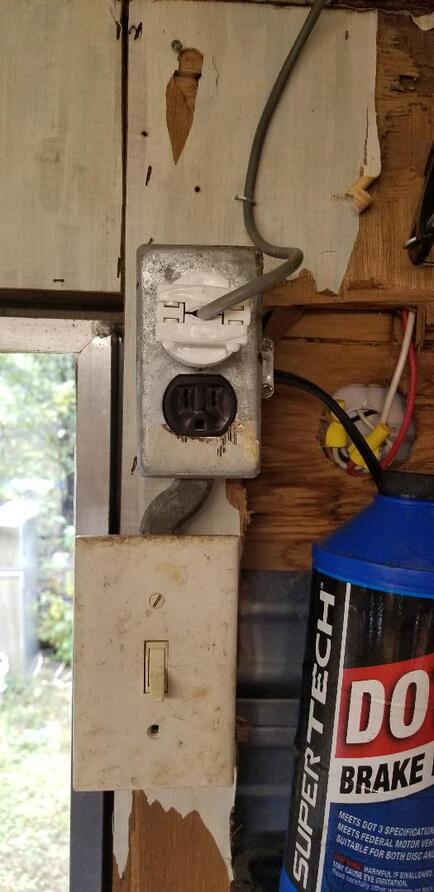
Outlet box and switch box at door to switch interior lights on and off.
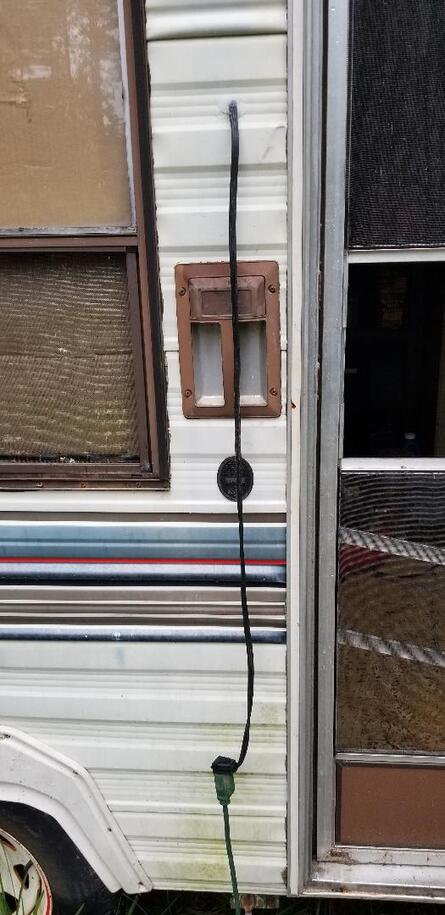
Power cable coming from opening in wall. With external extension cord hooked up the trailer has light power.
Rear light illuminating rear half of trailer.
One of the things I still have to do is install a power inverter and small battery with a small solar panel to power these lights when there is no grid power. Even though I do plan on running a power line from the house through to the compound area, it's still nice to have a back up means of powering things around a workshop. I still have to install a solar panel for the ventilation fan as well. Until then though I had to install some patches on the trailer body.
The next order of business was the finishing up of drying in the trailer. In the past I did caulk up the roof in the spots where it appeared like there were holes or other points where water could come in. As we had plenty of episodes of rain since then, I've been able to see where there's still a couple of leaks in the roof. Along with that, after removing the appliances from their spots in the trailer, there were openings in the sides that needed patching.
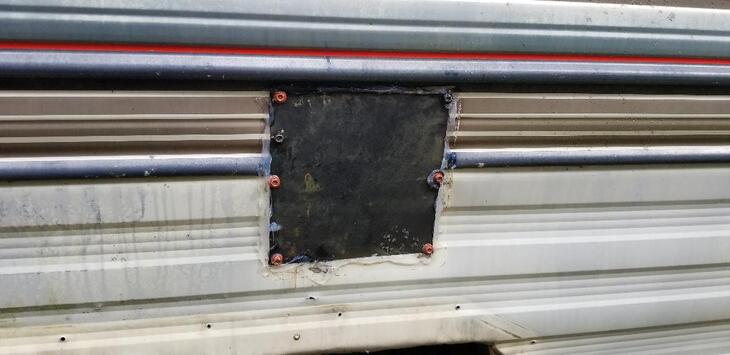
In order to patch the openings up I cut some patches from some scrap sheet metal I had in the scrap pile.. I applied beads of caulk to the insides of the panels then used self tapping screws to attach the panels in their spots over the openings. After finishing the larger openings I found two more smaller openings. Rather than cut more sheet metal for these rather small openings I used the next best thing, some electrical box covers. The openings were of just the right size to allow me to take the box covers and seal them with caulk and use their screw slots as anchor points for the self tapping screws I used to secure the covers to the small openings in the trailer. Lastly there were a couple of vent covers that served to cover the old appliances that were once in the trailer. These got liberal applications of caulk to seal them up. With these areas addressed as far as drying in is concerned, hopefully the trailer will be ready for the next rain to come through. We will surely see.
The next order of business was the finishing up of drying in the trailer. In the past I did caulk up the roof in the spots where it appeared like there were holes or other points where water could come in. As we had plenty of episodes of rain since then, I've been able to see where there's still a couple of leaks in the roof. Along with that, after removing the appliances from their spots in the trailer, there were openings in the sides that needed patching.
In order to patch the openings up I cut some patches from some scrap sheet metal I had in the scrap pile.. I applied beads of caulk to the insides of the panels then used self tapping screws to attach the panels in their spots over the openings. After finishing the larger openings I found two more smaller openings. Rather than cut more sheet metal for these rather small openings I used the next best thing, some electrical box covers. The openings were of just the right size to allow me to take the box covers and seal them with caulk and use their screw slots as anchor points for the self tapping screws I used to secure the covers to the small openings in the trailer. Lastly there were a couple of vent covers that served to cover the old appliances that were once in the trailer. These got liberal applications of caulk to seal them up. With these areas addressed as far as drying in is concerned, hopefully the trailer will be ready for the next rain to come through. We will surely see.
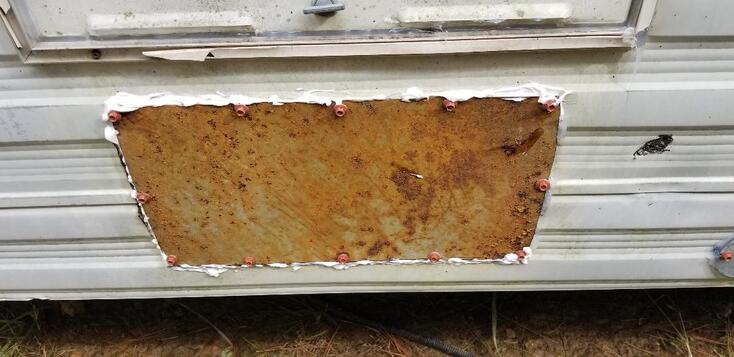
Large sheet metal patch over opening, note caulk bead around edges along with self tapping screws around edges.
Smaller sheet metal patch over opening, again note caulk bead and self tapping screws around edges.
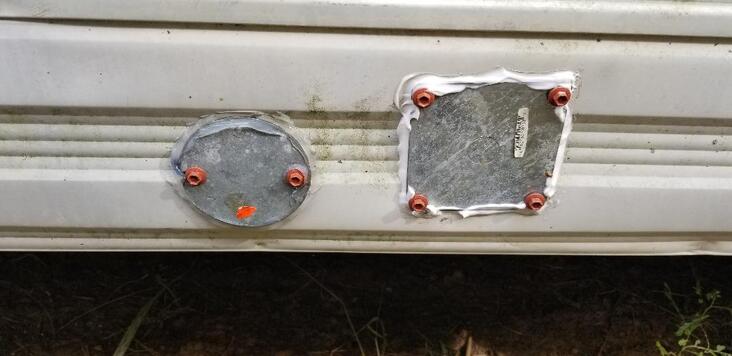
Electrical box covers being used as patches, note caulk bead and self tapping screws in grooves of covers.
|
|
|
|
|
|
|
|
|
|
|
|
|
|
|
|
|
|
