1976 Chevy LUV 2.8L Baby Truck Overhaul
Classic micro trucks, economical and utilitarian, what more can one ask for?..
Classic micro trucks, economical and utilitarian, what more can one ask for?..
This truck is an interesting vehicle to say the least. Of all the vehicles in the fleet, this is the only one that has gone through multiple powertrain projects in the years that we had the thing. It originally came with a 4 cyl engine but the intent was to transplant a 4 cyl diesel engine/manual transmission into the vehicle. We had a foreign variant engine/transmission in the vehicle and had the vehicle running pretty good, but then we discovered that we wouldn't be able to get the replacement parts for the engine and transmission as that particular variant of that rig was never imported to the US. We ended up finding a domestic variant of the diesel engine which was quite different, and retrofitted a Chevy LUV manual transmission to actually fit behind the engine. That sorta worked for a while but things would inevitably loosen up, plus the other engine was a little sickly.
The next idea was to try to rebuild the truck's original engine and put it in. That worked out but for some reason or another we couldn't get the engine right with the carburetor and fuel pump that were on there. After being discouraged from the diesel escapade, we ended up scrapping that idea pretty fast, only to later realize that the fuel pump was the primary cause of the engine running shitty, the pump that was on there to pump diesel fuel was just a little too strong for the lighter gasoline fuel. By that time we had already sold the engine and tranny so none of that mattered anyway.
With that, we ended up scrapping the whole diesel engine idea as the likelihood of finding the actual 4 cyl diesel engine/tranny combo that was an option in this truck was slim to nil, we just decided to put a more common powertrain, in this case a 2.8L V6 from an early 80's S10. That idea sorta worked for a while but for one reason or another, we could never quite get that engine right, really on the count of the carburetor, which was one that had myriad vacuum lines for the crude emission control systems and other crap that were on those vehicles during that short time. Even with multiple carburetors, the results were still the same, which meant that idea got scrapped too.
During all this time, we did have to do a number of things to the truck itself to bring it up to a better state regardless of the powertrain we installed. The first thing that needed attention was the dash.
The dash on the LUV was totally fucked up, deep cracks and an uneven leveling all across. An Ebay vendor happened to have one of those dash caps that you tend to see available for classic car dashes. These caps glue in place over the old dash, giving the dash a seemingly new fresh appearance again. Only the most discerning observer would really find such a patch to be unappealing. As far as someone like me who just wants the thing to look decent, preferring the patched up dash over the cracked up dash, I immediately bought this thing.
After receiving the dash cap, I had to clean the old dash off and cut chunks of the padding off to help level the dash enough that when I put the dash cap in place, it will fit evenly all the way across the dash. I emptied the entire contents of the glue tube over the dash cap and pressed the cap onto the dash, then wedged a couple of bags with some rags and a sheet between the dash and windshield, along with a sweatshirt. All of this at least helped to hold the dash cap down on the old dash well enough to allow the glue to cure so the following morning when I removed the stuff from the dash, the cap was still sitting nicely on the old dash, making the overall appearance of the dash look a lot better than what the old one did.
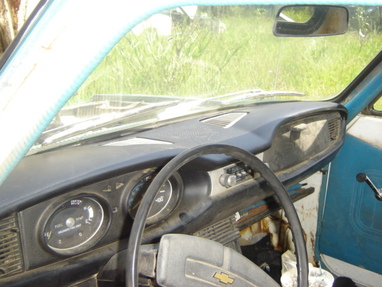
The new dash cap in place, note difference between new cap and rest of faded dash
Another thing I did was install two bucket seats we pulled from a Toyota Cressida at the junkyard. It turned out the seats fit just fine, they weren't too wide or high or deep. In fact, they fit perfectly, and the mounts look pretty easy enough to modify to fit the floor of the LUV. Another cool perk about these seats, since the Cressida was a "bells & whistles" model, the driver's seat had controls to adjust the height and in/out position of the seat base, to fit the driver's ass, plus a seat warmer, also for the driver's ass. It's nice to know that a seat can be made so lovingly with the driver's ass as a first priority!. Seriously though, with these seats in place, at least driving this truck will be more comfortable than it would've been with the ratty bench seat that the truck originally came with.
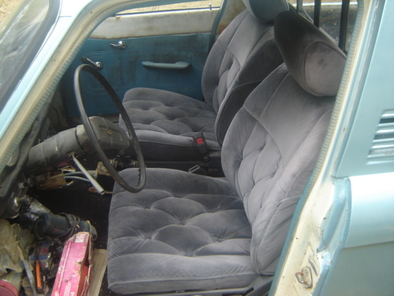
Bucket seats placecd in truck for fitting, looks a lot better now...
Another thing that I had to do was install new gauges since during the diesel project, the stock temperature gauge failed to work right, and the charge and oil pressure indicators (just lights, not even gauges), were not really hooked up to anything to allow them to work. I bought a triple gauge cluster from Harbor Freight and installed it in the LUV.
I had to install some plumbing reducer bushings in the hole for the original sending unit so I can put the fitting for the temperature gauge in place, since instead of the gauge being electrical and going to a sender unit, it uses some kind of probe that's hooked up to the gauge. I also had to install a special fitting in place of the oil sender unit and route a narrow tube over through the firewall and to the oil pressure guage since it literally uses the pressure of oil in the tube to register a reading on the gauge. The alternator wasn't too bad to hook up, with just a tap in the starter circuit, done inside the dash where the line comes from the starter switch before going through the firewall. The gauge lights were also hooked up, by just tapping into the circuit for the original gauge lights on the headlight circuit. At this point all the gauges are ready to rock and roll.
Another thing I did was clean up the bed and paint on a generic bedliner to help protect the bed for a good while. While its not as good as Line-X or Rhinoliner, hey, this is an old cheap truck, what better way to go with the bed liner than cheap?
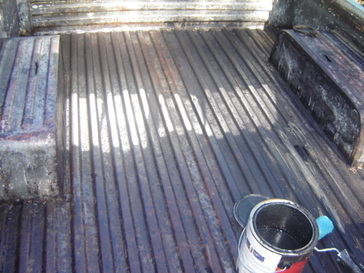
Bed with Hurculiner half applied
I patched a couple of holes in the cab as well. I cut out a section of the floor behind the passenger seat to get rid of the rotted out area, and I took a scrap oil drum lid from my scrap pile and cut a rectangular patch out of it to weld in place. I ground the rust out to expose clean metal so the welding will go cleanly.
Next on the list is the rest of the interior. For starters, I took some vinyl/fabric spray paint, in gloss black and spray painted most of the interior. The headliner and door panels along with these vinyl moldings all got sprayed black. I then took some regular black spray paint and sprayed the white inner walls of the cab, especially around area behind the seats.
The next thing I did was install some seatbelts that we picked up from the junkyard. These seatbelts came from another LUV so they would fit directly into our truck with no hassles. The only thing is the belts came from a light brown interior so they too were light brown. Out came the vinyl paint and they got sprayed completely in order to match the newly sprayed black interior of our truck. I did have to remove these boards that held a couple of speakers so I can access the bolt hole for one portion of each seatbelt. Now the funny thing is on the female portion of the seatbelts (the portion that was still in our truck), I was about to spray them black since they were the truck's shade of blue, but just for the hell of it I tried the new junkyard seatbelt male portion in the seats' female seatbelt latches and they actually fit, so what did I do? I removed the blue female seatbelt latches and set them aside (nevermind that I actually sprayed them already when I came to this final decision, but whatever).
Now that we have the seatbelts in place, matching the interior, I took the speaker boards and trimmed them down so I can fit them back in the original spots they were put in by the previous owners. I drilled a couple of new holes for each board and secured them in place so now the truck has its sounds back as well as a new black interior.
The next thing on the list is the sunvisors. The plastic pieces on each visor that was used to screw them to the ceiling were both broken, so I had to fabricate a couple of mounting plates from small pieces of thin plate metal, with the screw hole patterns matched up so when I put the mounting plates onto the visor shafts, I can then remount them up to the ceiling of the cab. Of course since these visors were blue, they got sprayed black before installation.
The last thing I did was drill a series of holes around the right door panel and secured them with sheet metal screws, since the panel had a lot of warps and ripples that kept the panel from fitting flush against the door. A once over with some paint to cover the screw heads blended them in with the panel. The only thing left now is a new black carpet and the interior will be totally complete.
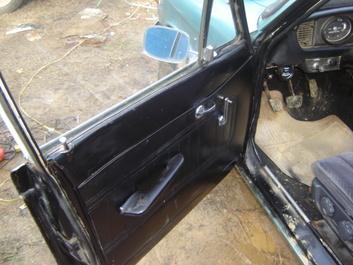
Newly painted door panel and door
|
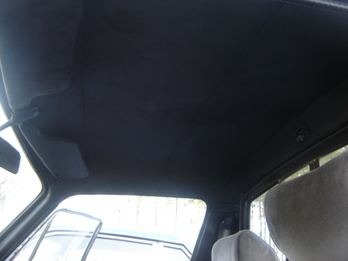
Headliner and visors painted over
|
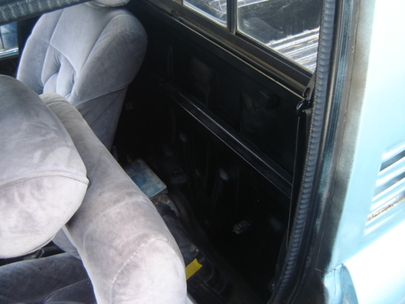
"Backseat:" area also painted black
Another thing I did was install another radio in the truck after a simple broken antenna removal resulted in the fucking up of the old radio that was in the truck. Somehow during the process of removing the heater core box and a shelf under the glovebox I somehow cut the cable for the antenna. Don't ask how I did that, I still don't even know how I did it. Anyway, I removed the antenna from the fender then went ahead to pull the other part of the cable from the back of the radio. I went to pull the cable from the back of the radio, not realizing that the radio had a short length of cable coming out of the back that terminated at the female end of the antenna cable. Point is, pulling on the cable at the back of the radio fractured the cable sheath and the shielded conductor in the cable. The only way I can see repairing that damage is replacing the female connector with another one, soldering it onto the board. The radio for now, is useless.
There was a light at the end of the tunnel however. Since we had sold our old F350, I removed the CD stereo and radar detector from it since this is about $200 in electronics I would have to get to put in one of the other vehicles. I took the CD stereo and installed it in place of the fucked up radio. Even though I planned on using the cassette radio that was in the truck since I can put a tape adapter in the radio and plugging our MP3 player to it, the CD radio is an MP3 CD radio as well so I can put a data CD with a bunch of MP3's in it and accomplish essentially the same goal. Besides, the radio adds a bit of a modern twist to this otherwise old and plain truck.
There was an added bonus for the truck that I did as well. I went ahead and did an inverter install. Part of the reason for doing this was to utilize some hardware that would've otherwise continued to collect dust in the storage shed. I already have several inverters, none of which are being used. By doing this project, I can add something to the LUV that would make the truck even more versatile by allowing me to use 110VAC devices while on the road or in the field.
The first thing I did was take the inverter and secure it to a small piece of plywood using some metal braces, which was then mounted right behind the driver's seat. Afterward I took a four outlet box that I assembled and mounted it to a small piece of plywood as well, which was then mounted to the back wall of the cab right over the driveshaft hump. I then put together a cable with a short length of romex cable and a male three prong plug. This plug plugged into the power inverter while the other end of the cable went to the outlets. The last thing I did was take a twisted pair of wire and connected it to the inverter and ran the pair of wires under the carpet on the left side of the driver's seat and up to the underside of the steering column. I then installed a lighted toggle switch on the left side of the steering column to the direct right of the glow plug switch. The next thing I did was run a wire directly from the battery with an inline fuse in place and connected it to one end of the switch while connecting the other end to the positive lead for the inverter. The last wire from the inverter went to a frame ground. With that, the inverter was installed and worked like a charm, I throw the switch, it lights up and the inverter came on, just fine.
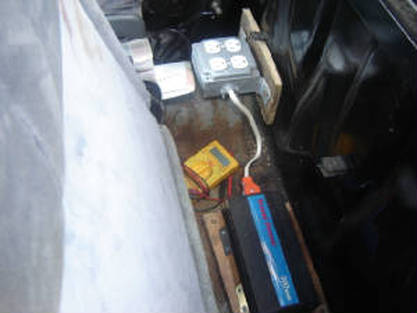
Inverter and outlet box installed behind seats
Now with regard to the powertrain to be installed, we ended up settling on reusing the Ford 2.3L 4 cyl and its C3 automatic transmission, pulled from our 88 Mustang, which was wrecked by my other half due to not paying attention. I rebuilt the engine as it was already worn quite a bit to begin with. We ended up having to work at fabricating motor mount plates out of scrap metal to hold the powertrain in place. These mounts use no rubber, its just a direct metal to metal suspension of the powertrain to the truck's frame.
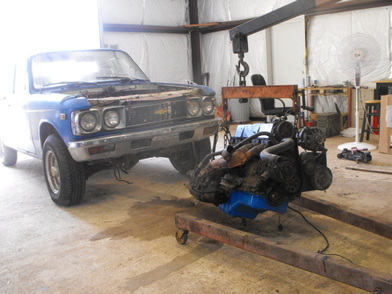
Engine staged in front of truck ready for installation
|
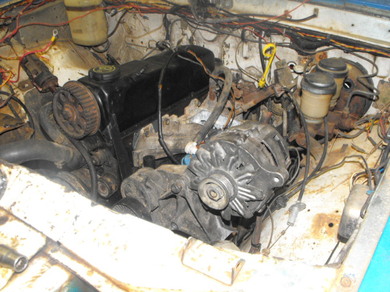
Engine in place inside engine bay of truck
|
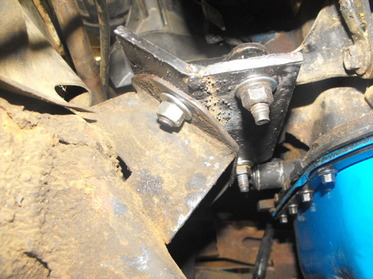
Closeup of fabricated motor mount
